|
In This Section
Creating a New Service Ticket
To create a new service ticket, click the Add button located in the bottom left of the form. The user is now ready to enter in all the necessary information. Please follow the steps below.
| • | Choose either your customer or select the specific site of the equipment. |
| • | If the Customer has a Service Level Agreement in place then select the specific Job No. |
| • | The appropriate Service Level (e.g Gold, Silver or Bronze) will automatically display. |
| • | Enter a Customer PO, Status and a customer reference number if required |
| • | Enter a description of issue |
| • | Save the Service Request (Ticket # is automatically generated) |
| • | Check that all information is correct then go to the Reports menu to view and print the ticket |
To refer to this Service Ticket in the future simply select it from the drop down combo box labeled Ticket No in the top left corner of the form.
NOTE: If the user creates a transaction then clicks ADD and creates another transaction, the last transaction created gets associated to the service ticket. However if the user presses UNDO then creates a new transaction that is NOT updated.
Editing Existing Service Tickets
To edit an existing Service Ticket, choose the Service Ticket you want from the drop down combo box and then make any changes necessary.
Deleting Service Tickets
A Service Ticket should not be deleted unless absolutely necessary. It is always better to edit an existing Service Ticket rather than deleting it. If it is imperative that the Service Ticket be deleted then click on the Delete button, which is located in the bottom left corner of the form.
Selecting Service Items
Once you have completed the top part of the form such as Bill-To, Ship-To information and header information you can select the Item information that the Service request is for.

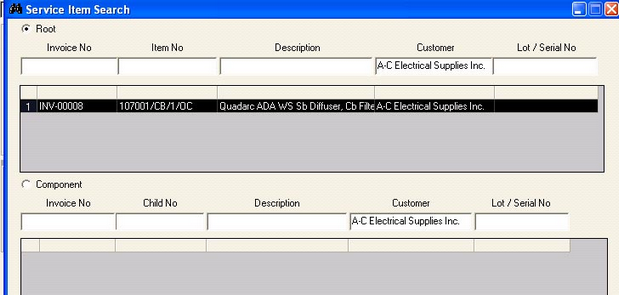
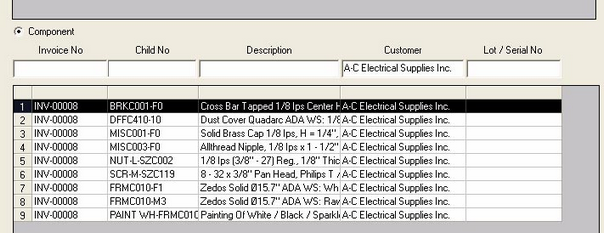
By clicking on the Binoculars a new form appears. By selecting either [Root] or [Component] you can choose either the main item or any of its child items to bring back into the Service form.

Or

You also have the ability to enter a generic item number should the item not exist in your database. This is sometimes used when companies offer service to products they do not manufacture.

The sub-header also allows you to further define the details of the Service request. It allows you to properly categorize or group the suspected issue.
Using the Issue Category and Issue fields you can filter non related issues based on the Issue Category. For example an Issue Category could be Lights Not Working. From this selection you can narrow down the possible issues based on the category. Possible issues related to Lights Not Working could be Defective Parts, Missing Parts, Broken Parts or Unknown at This Time.

Generating Transactions from a Service Ticket
Once a Service Ticket is created it may be closed without any other related transactions. This would be the case if the customer is just making a general inquiry. Frequently the customer may request more concrete action and related system transactions are required. This would be the case if the customer wants to return defective product, repair an existing product, ask for spare parts etc.
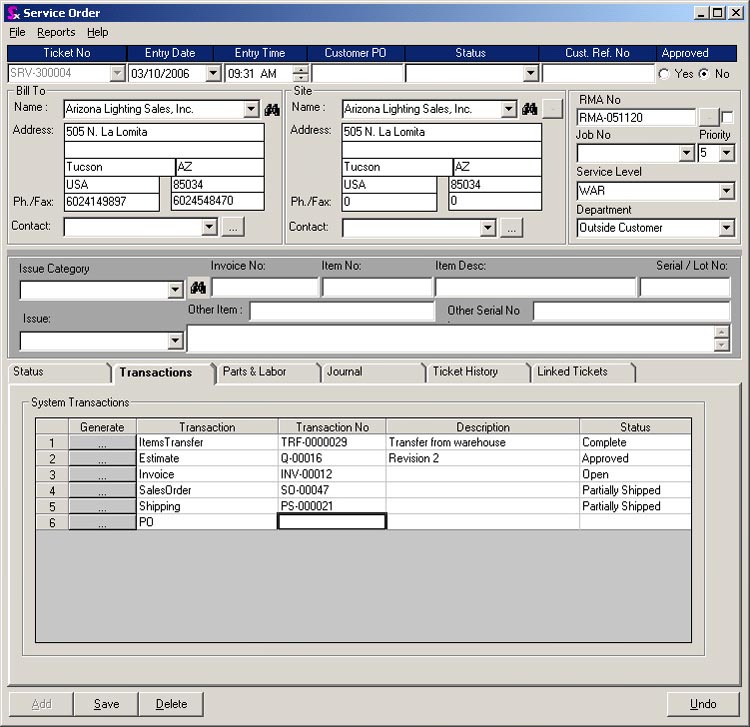
The Transaction Tab enables you to issue a variety of transactions related to the Service Ticket. By clicking on the Transaction Tab the form below appears.

NOTE: A special procedure has been created in all modules called from the transaction generation process of the Service Order to ensure that the first Transaction Number generated is always returned and displayed in the Transactions tab in the Service Order form.
In addition a validation routine has been added to the Service Order that will prevent user from approving Service Order which has Transactions without a Transaction Number.
Adding Non Sell Items to a Service Ticket
When adding miscellaneous items to a service ticket, it is possible to add any active item that has been created in OrderStream, even those that are not flagged as sell. When non sell items are loaded onto the Parts and Labor tab the background of the item number field changes to a blue colour as per the Parts Legend located on the right side of the form.

When a transaction, such as a sales order, is created for the service ticket via the Transactions tab, the non sell items will be converted to a sell item so it can be transferred to the new sales order. You are prompted that this conversion will occur.

Clicking Yes will proceed with the creation of the sales order and will convert the non sell item into a sell item. Clicking No will cancel both processes.
|

