|
Processing Shipments in WorldShip
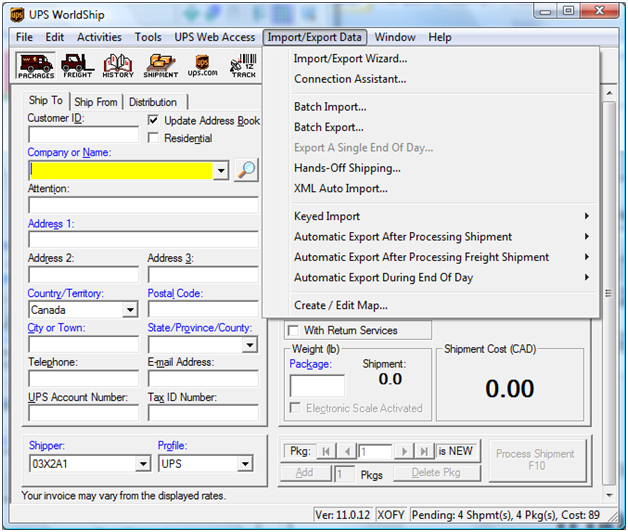
| 2. | Click on the UPS Import/Export Data menu. |
| 3. | Select Keyed Import option. For the sub menu that appears, select the name of your ImportMap created in Creating an Import Map in WorldShip |
NOTE:
If the name does not appear on the menu, select the More option. The name should appear in the list; if the name you entered does not appear in the list you will need to create the import map manually. This is common for network setup of UPS or if WorldShip was installed on your PC using a path different than the default.
| 4. | The Enter Import Key window opens. Enter a Seradex OrderStream number for an approved shipment and press Enter (do NOT click on the Close button). The data from the shipment will automatically populate the form. Process the shipment as you normally would. Enter a shipment number in the Enter Import Key window to process another order. |
NOTE: If you return to Seradex OrderStream and make changes to a shipment, you will not see the changes in WorldShip until you close and re-open the Enter Import Key window.
Creating an Import Map in UPS WorldShip
| 2. | On the Tools drop down menu, select Profile Editor. The Profile Editor screen will open. |
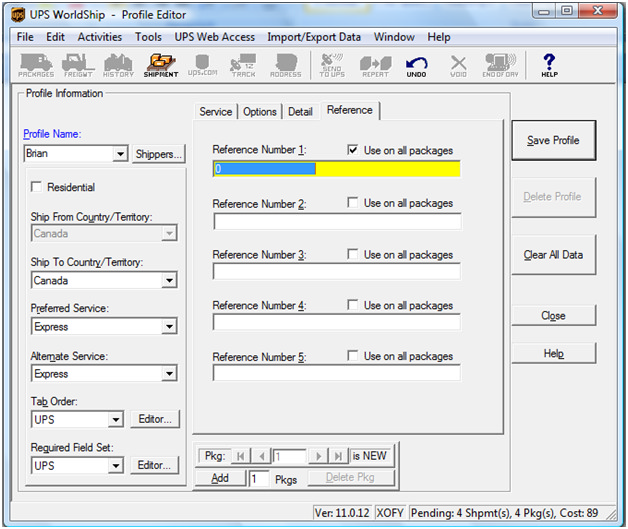 Profile Editor Screen
| 3. | Select your profile from the Profile Name drop down menu and click the Reference tab. In the Reference Number 1 field enter 0. Check the Use on all Packages box. |
| 4. | Click the Options tab and ensure the Quantum View Notify box is unchecked. Click Close to return to the main Worldship screen. |
| 5. | Click the UPS Import/Export Data drop down menu and select Create/Edit Map. |
6. In the New Map area, select Import from ODBC Database.
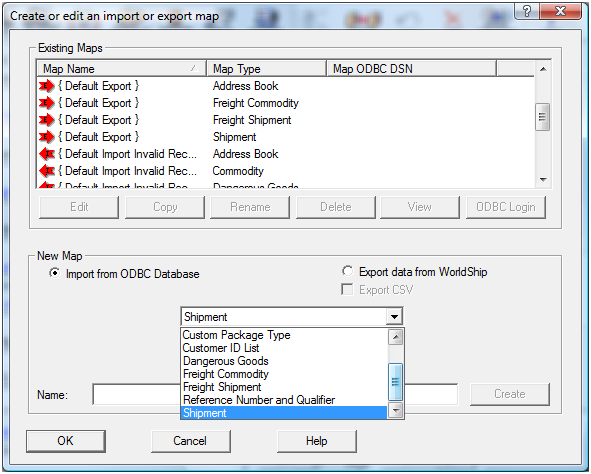
7. Select Shipment from the drop down list for the map type.
8. Enter a name for the map in the Name field (Choose any name e.g. WorldShip Import Map)
9. Click the Create button. The Select an ODBC source box will open.
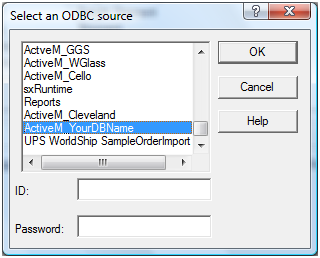
10. Select a ODBC connection (DSN):
This is the ODBC source (System DSN) that should point to your Seradex OrderStream ActiveM database where the source query to retrieve the Shipping information resides. The query can look like this (e.g. query name: UPSShipments):
SELECT dbo.SalesOrder.SalesOrderNo, dbo.Shipping.ShippingNo, 'Shipping' AS Shipping, dbo.CustomerShipTo.Name AS ShipToName, dbo.CustomerShipTo.Phone AS ShipToPhone,
dbo.CustomerShipTo.Fax AS ShipToFax, dbo.Addresses.AddressL1 AS ShipToAddress1, dbo.Addresses.AddressL2 AS ShipToAddress2,
dbo.Addresses.AddressL3 AS ShipToAddress3, dbo.Addresses.PostalCode AS ShipToPostal, dbo.Cities.DescriptionShort AS ShipToCity,
dbo.StateProv.StateProvCode AS ShipToState, dbo.Countries.DescriptionTiny AS ShipToCountry, dbo.Contacts.Name AS ShipToContact,
dbo.Customers.CustomerNo AS BillToCustomerNo, dbo.Customers.Name AS BillToName, dbo.Customers.Phone AS BillToPhone, dbo.Customers.Fax AS BillToFax,
dbo.Customers.email AS BillToEmail, Addresses_1.AddressL1 AS BillToAddress1, Addresses_1.AddressL2 AS BillToAddress2,
Addresses_1.AddressL3 AS BillToAddress3, Addresses_1.PostalCode AS BillToPostal, Cities_1.DescriptionShort AS BillToCity,
StateProv_1.StateProvCode AS BillToState, Countries_1.DescriptionTiny AS BillToCountry, 'Order ' + dbo.SalesOrder.CustomerPO + ' has shipped' AS EmailText,
dbo.Shipping.Weight, '' AS Cancelled, dbo.Shipping.Comment AS UPSNotification1, '' AS Residential, dbo.Contacts.email
FROM dbo.StateProv RIGHT OUTER JOIN
dbo.Countries RIGHT OUTER JOIN
dbo.Cities RIGHT OUTER JOIN
dbo.Addresses INNER JOIN
dbo.SalesOrder INNER JOIN
dbo.CustomerShipTo ON dbo.SalesOrder.CustomerShipToID = dbo.CustomerShipTo.CustomerShipToID ON
dbo.Addresses.AddressID = dbo.CustomerShipTo.AddressID RIGHT OUTER JOIN
dbo.Shipping LEFT OUTER JOIN
dbo.Customers INNER JOIN
dbo.Addresses AS Addresses_1 ON dbo.Customers.AddressID = Addresses_1.AddressID ON dbo.Shipping.CustomerID = dbo.Customers.CustomerID ON
dbo.SalesOrder.SalesOrderID = dbo.Shipping.SalesOrderID ON dbo.Cities.CityID = dbo.Addresses.CityID ON dbo.Countries.CountryID = dbo.Addresses.CountryID ON
dbo.StateProv.StateProvID = dbo.Addresses.StateProvID LEFT OUTER JOIN
dbo.Contacts ON dbo.CustomerShipTo.ContactID = dbo.Contacts.ContactID LEFT OUTER JOIN
dbo.Cities AS Cities_1 ON Addresses_1.CityID = Cities_1.CityID LEFT OUTER JOIN
dbo.StateProv AS StateProv_1 ON Addresses_1.StateProvID = StateProv_1.StateProvID LEFT OUTER JOIN
dbo.Countries AS Countries_1 ON Addresses_1.CountryID = Countries_1.CountryID LEFT OUTER JOIN
dbo.Contacts AS Contacts_1 ON dbo.Customers.ContactID = Contacts_1.ContactID
WHERE (dbo.Shipping.Approved = 0)
| 11. | Select UPS Shipments query from ODBC Tables drop down list on the left. The list of fields in the table appears in the window below the drop down list. |
| 12. | Using the UPS WorldShip Field Map table below, you will now begin mapping fields from the UPS Shipments query of Seradex OrderStream ActiveM(on the left side) to the corresponding fields in WorldShip(on the right side). |
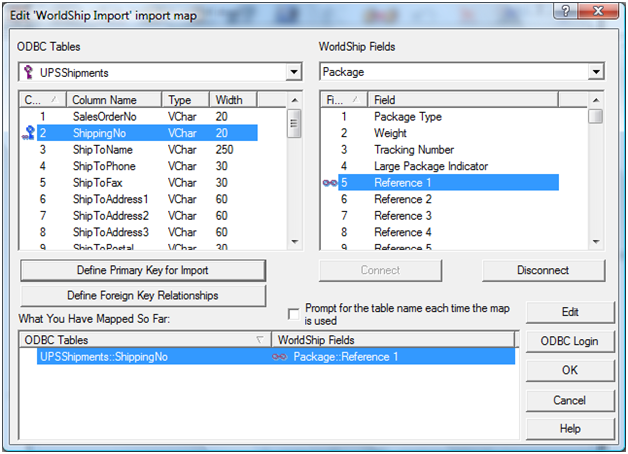
| 13. | The first field to map is ShippingNo. Before mapping it, you must define this field as the primary key. Select ShippingNo and click on the Define Primary Key for Import button. This sets the shipping number in OrderStream as the primary identifier for the shipping record. As small blue appears next to the ShippingNo row. |
| 14. | Now with ShippingNo still selected map the field. Using the drop down list under WorldShip Fields, select the category(table), Package. From the corresponding list the windows below Package, select the field Reference 1. In essence, this relates Seradex OrderStream field, "ShippingNo" to the "Reference1" field in the "Package" category of WorldShip. |
| 15. | Click on the Connect button to link the fields. A small red infinity symbol appears next to the fields indicting that they are now linked. You can then see the linked fields in the What You Have Mapped So Far list at the bottom of the screen. |
| 16. | Repeat steps 14 and 15 until you have mapped all of the fields listed in the table, UPS WorldShip Field Map, below. (For each field mapping, be sure to select the category listed in the table below from the WorldShip Fields drop down list). |
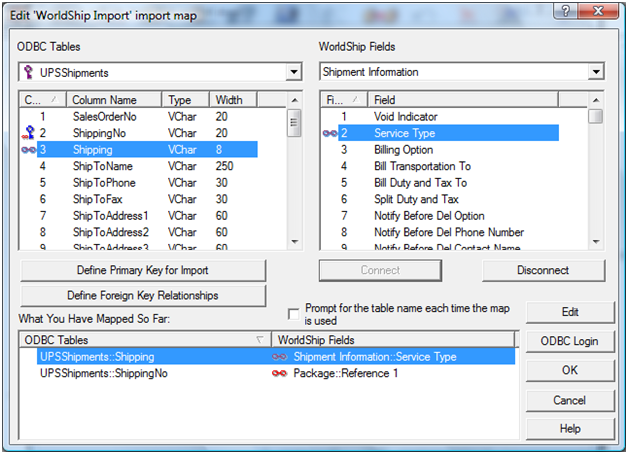
| 17. | When you get to the Shipping field you must perform a couple additional steps to map Service Type names in WorldShip to those you have setup in OrderStream(Ship Via). |
| 18. | After you map the Shipping field, highlight the mapping in the lower window, What You Have Mapped So Far. |
| 19. | Click the Edit button. |
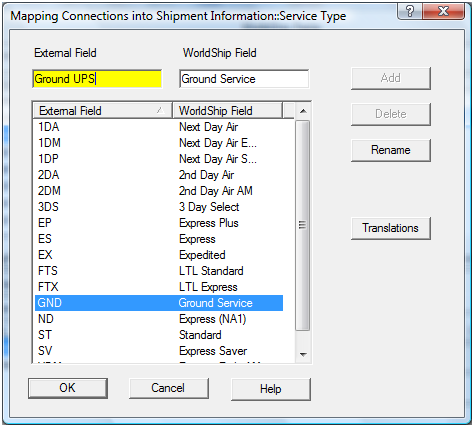
| 18. | The Mapping Connections into Shipment Information window opens. Click Translations. |
| 19. | In the Select a common map box, select Service. Click OK. This loads the default service options into the External Field and WorldShip Field lists. |
| 20. | The External Field list represents the Seradex OrderStream names for corresponding WorldShip services listed in the WorldShip Field list. (i.e. 1DA is the OrderStream default name for WorldShip Next Day Air). Highlight each service type (i.e. Shipping methods) that you use. In the External Field field type the name you used in OrderStream setup for that service type. Click Rename to save each re-named service type. (If make a mistake, click Translations, and then Service, OK to reload the default service option lists again.) When you are finished renaming all your service types, click OK. |
| 21. | Continue mapping the fields according to the UPS WorldShip Field Map below. When all of the fields are properly linked, click on the OK button. Your view returns to the Create/Edit Map window. |
UPS WorldShip Field Map (for versions 5.x and later)
Seradex OrderStream Field
|
WorldShip Category
|
WorldShip Field
|
ShippingNo
|
Package
|
Reference1
|
CustomerNo
|
Ship To
|
CustomerID
|
Email
|
Ship To
|
Email Address
|
Email
|
Shipment Information
|
Notification Recipient 1Email
|
Shipping
|
Shipment Information
|
Service Type
|
Weight
|
Package
|
Weight
|
Cancelled
|
Shipment Information
|
Void Indicator
|
ShipToName
|
Ship To
|
Company Or Name
|
ShipToContact
|
Ship To
|
Attention
|
ShipToAddress1
|
Ship To
|
Address 1
|
ShipToAddress2
|
Ship To
|
Address 2
|
ShipToCity
|
Ship To
|
City or Town
|
ShipToState
|
Ship To
|
State/Province/County
|
ShipToPostal
|
Ship To
|
Postal Code
|
ShipToCountry
|
Ship To
|
Country/Territory
|
ShipToPhone
|
Ship To
|
Telephone
|
UPSNotification1
|
Shipment Information
|
QVN Ship Notification or Return Notification 1 Option
|
UPSNotification1
|
Shipment Information
|
QVN or Return Notification Option
|
SalesOrderNo
|
Package
|
Reference2
|
Residential
|
Ship To
|
Residential Indicator
|
22. Click OK to return to the WorldShip screen.
|


