|
Tax Groups allows the user the ability to combine multiple Tax Authorities together. For example, if there are two Tax Authorities, a GST and a PST, it is possible to create a Tax Group that includes both of these Tax Authorities.
This group can then be applied to a Customer so that whenever this customer is chosen in a sales order, both GST and PST would be applied to each line item on that Sales Order.
Please Note that for systems that are using Accpac For Windows, you will only be able to select a tax group on a document where the currency of the tax group matches the currency of the customer/Vendor. This is to work the way Accpac does, if you are using another accounting system then this does not apply.
Adding New Tax Groups
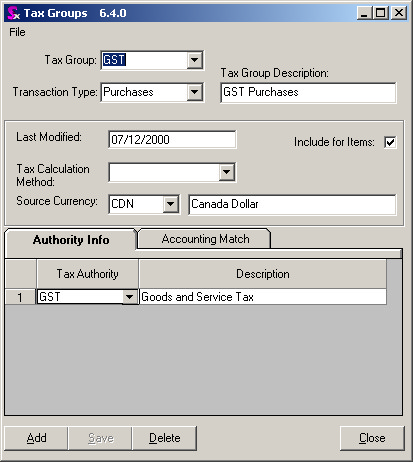
The first thing that needs to be done is to click the [Add] button located in the bottom left of the form. Doing this will clear any information that is already on the form and prepare it for the entry of new information. Please follow the steps outlined below to enter a new Tax Group.
| 1. | Enter both the name and description of the Tax Group at the top of the form. |
| 2. | Select the transaction type. (This will either be sales or purchases). |
| 3. | Check off the button labeled Include for Items:. (When the Include for Items: button is checked off, it is possible to assign different tax rules based on both customer and item tax defaults. If this option is not checked off, the program will apply the default tax group of a Customer or Vendor, regardless of what the item tax default may be.) |
| 4. | Fill in the Source Currency. This will always default to whatever the Source Currency was set to for your company in Company Setup |
| 5. | Under the Authority Info tab, select the Tax Authority that is to be included in this group, and then select whether it is taxable or not. |
| 6. | To add another Tax Authority simply press the Insert button on the keyboard and a new blank line will appear which can now be filled in with the appropriate information. |
| 7. | Click on the tab labeled [Accounting Match]. Fill in the name of the Tax Group within Accpac that relates to the Seradex Tax Group that was just created. |
Once the above steps have been concluded, the Tax Group can be saved into the system by simply pressing the [Save] button in the bottom left corner of the form. At this time the field labeled Last Modified will fill in with the current date. This date will automatically be updated whenever a change is made to the Tax Group, with the date that the change was made on.
Editing An Existing Tax Group
To edit an existing Tax Group, simply choose the Tax Group you want from the drop-down menu in the upper left hand corner of the form and then make any changes necessary.
Deleting A Tax Group
A Tax Group should not be deleted unless absolutely necessary. The Tax Group may be attached to many different customers, vendors, or items, and deleting it can affect the manner in which the program operates (i.e. improper taxes being applied to Sales Orders or Purchase Orders). Although this may not be the case, it is always better to try and edit a Tax Group, rather than deleting it.
|


