|
When installing SQL Server, ensure the default Collation is set to Dictionary order, case-insensitive, for use with 1252 character set (SQL_Latin1_General_CP1_CI_AS) and set Regional Options to English US. Also make sure that Mixed Mode Authentication (Windows and SQL Server Authentication) is selected.
To avoid potential connectivity issues, please ensure that the SQL Server Browser service is running on the server running SQL Server. Also if a firewall is enabled (i.e. Windows Firewall) on the server running SQL Server, please ensure that firewall exceptions are created to permit SQL Server to pass through the firewall.
ActiveM Database Setup
Detach the ActiveM database from the old SQL Server and copy the database files to the new SQL Server. Attach the ActiveM database to the new SQL Server using the same name it was attached as previously.
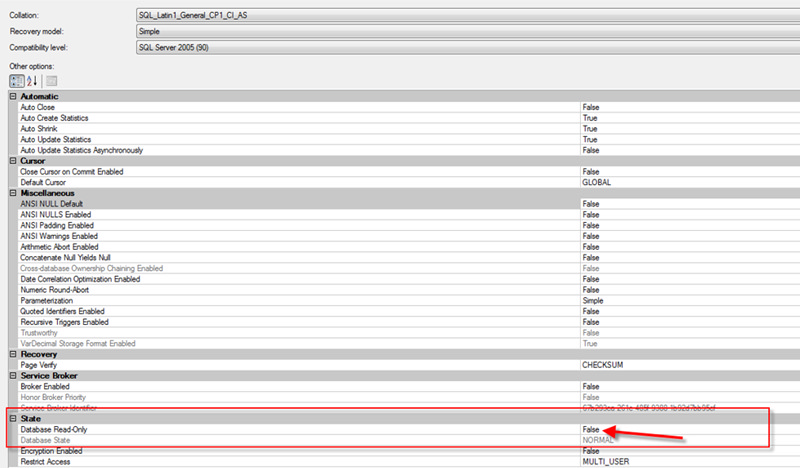
Reattach the ActiveM database to the old SQL Server and place the database in Read Only mode. Keeping the ActiveM database on the old SQL Server online until all OrderStream databases have been auto updated will make the transition to the new SQL Server easier. Placing the database in Read Only mode will prevent users from committing any transactions to the old ActiveM database. To place the ActiveM database on the old SQL Server in Read Only mode, do the following in SQL Server Management Studio:
1) Right click on the ActiveM database in the Object Explorer and select Properties
2) Click on the Options page
3) In the State section of the form (shown below), change the selection for Database Read-Only from False to True.
Seradex Utilities
Log in to the Seradex Customer Care portal (www.seradex.com/techsupport) and create a new ticket stating you will be performing a migration to a new SQL Server. You will be provided with additional documentation pertaining to the tasks that must be completed as part of the server migration, a recommended SQL Server Maintenance Plan configuration as well as a zip file that contains the SQL scripts that be run on the SQL master database and on the ActiveM as part of the migration.
SQL Server Logins
In order for users to be able to connect to the SQL Server, logins have to be created. Logins can be created for Active Directory security groups or they can be created on a user by user basis. Note that Seradex OrderStream uses Windows Authentication to connect to the SQL Server.
To create new logins, open SQL Server Management Studio and connect to the SQL Server. Expand the Security entry in the Object Explorer to reveal Logins as shown in the following image.
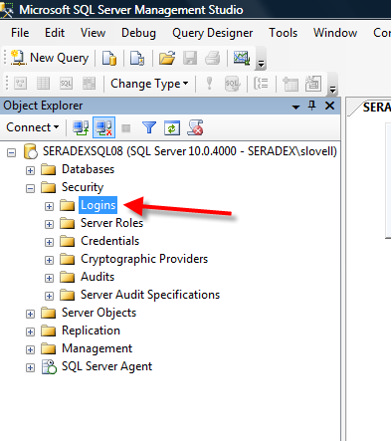
Right click on Logins and select New Login. The form shown below will open.
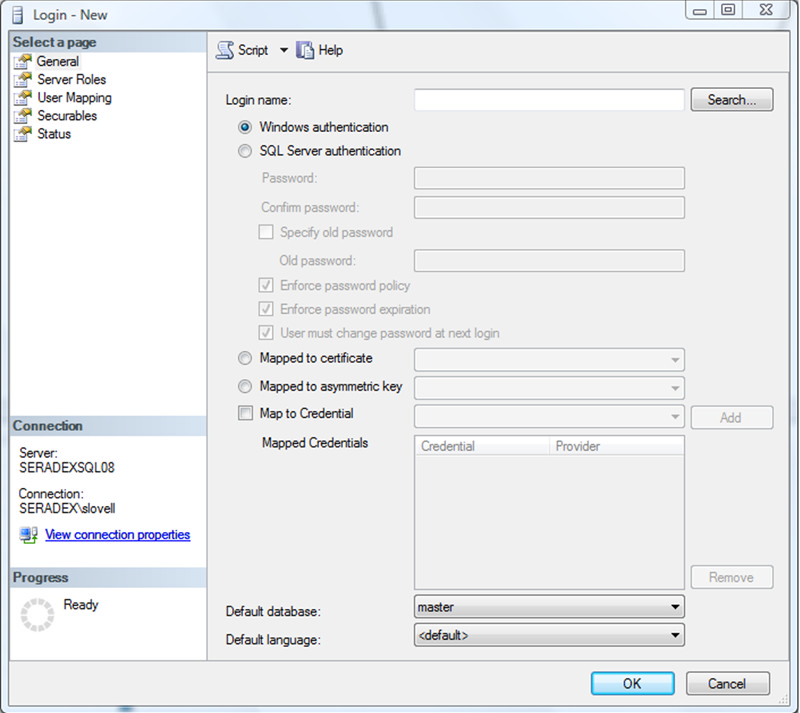
If you do not know the entire group name or username you can click the Search button.
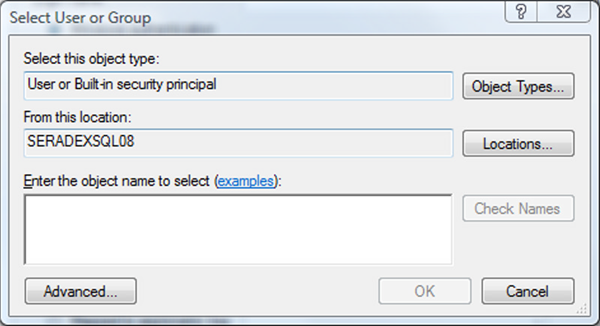
In the image above the form is looking at the local server. You need to include your domain to be able to add the required groups/users. Click the Locations button. Expand Entire Directory and select your domain.
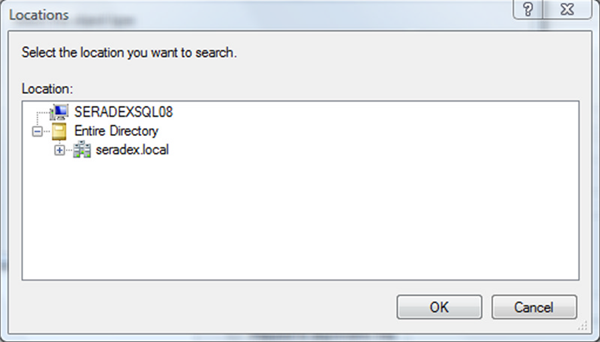
Click OK.
Type the name of the group or username then click the Check Names button. The full group or username will be populated as shown in the next image.
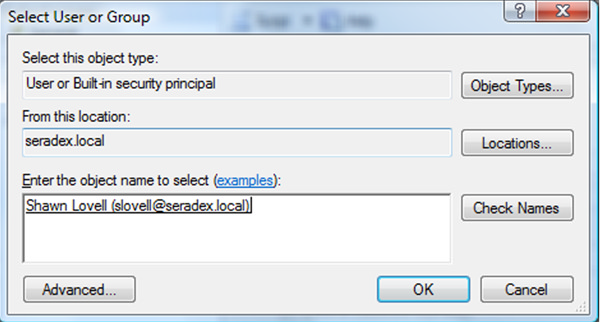
Click OK.
Click on the User Mapping tab. Map the new login to all ActiveM databases and the SQL Server master database and grant db_owner and public database role membership.
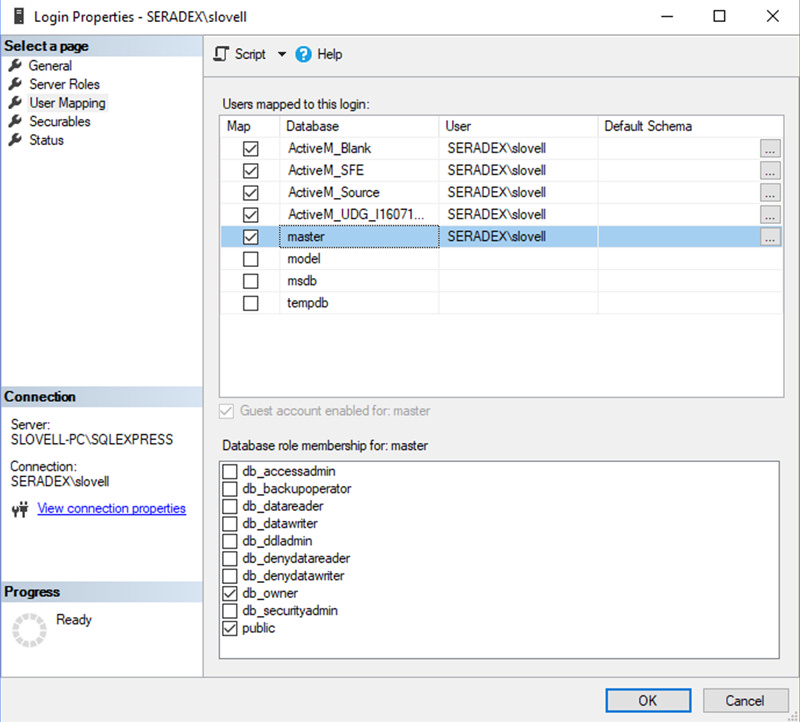
Click OK. The new login should be created successfully.
Migrate the sxSystem database to the new SQL Server
The sxSystem database should also be migrated to your new SQL server once the migration of the ActiveM database has been completed. Attach the sxSystem database to the new server using the same name it had on the old server. Map the SQL Server logins to the sxSystem exactly as you mapped then to the ActiveM and master databases (db_owner and public). Leave the sxSystem on the old SQL Server accessible until the migration has been completed in its entirety.
Migrating the sxRelease folder to the new server
If the Seradex sxRelease folder is to be relocated to the new server, this folder and its contents must be copied from the old server to the new one. Share the folder and assign the same share and folder permissions that were granted on the old server. OrderStream users require modify permissions on the Share and on the sxRelease folder. If mapped drives were created on workstations running OrderStream, the mapping must be updated to reference the new server.
Configuring Seradex OrderStream to connect to the new SQL Server
Using SQL Server Management Studio, open the Databases table of the sxSystem database on your new SQL Server.

Update the SQLServerName field to contain the name of the new SQL Server and the instance (if a named instance was created during SQL Server installation). In the above example, SeradexSQL03 is the name of the SQL Server while sql16 is the name of the instance. This will configure OrderStream to connect to the ActiveM database on the new SQL Server.
Also, check the contents of the LinkedServerName and Reports fields to ensure there are no references to the old server name and replace as necessary (in the event that UNC naming has been used to define the file path in these two fields).
Next, you need to instruct OrderStream to connect to the sxSystem database on the new SQL Server. Using Notepad, open the version of SeradexMasterConfiguration.xml that is located in sxRelease\sxRuntime.

Update the value specified as the SystemDBServer to the name and instance of the new SQL Server that the ActiveM and sxSystem databases have been migrated to then save your changes.
Once the master copy of SeradexMasterConfiguration.xml has been updated with the new SystemDBServer, set all OrderStream workstations to auto update via the Seradex Administration form, which is accessed via Admin Tools > Setup Auto Updater. Click the Update All button to select all workstations then click the Save button. Once this has been done all users may be instructed to restart OrderStream. The auto update process will initiate, copying the updated master copy of SeradexMasterConfiguration.xml to each workstation. When OrderStream launches after the update has completed, it should be connected to the ActiveM and sxSystem databases that are attached to the new SQL Server.
|

