|
In This Section
Creating New Purchase Orders
The first thing that needs to be done is to click the Add button located in the bottom left of the form. Doing this will clear any information that is already on the form and prepare it for the entry of new information. The user is now ready to enter in all the necessary information. Please follow the steps below to do this.
Header Section
| 1. | Enter the buyers name by using the drop-down menu in the field Buyer. Alternately the buyer name will default if their log on name is entered on the Employee form in Lookups module. |
| 2. | Under the Vendor heading select the appropriate vendor by either using the drop-down menu or the type-ahead feature. |
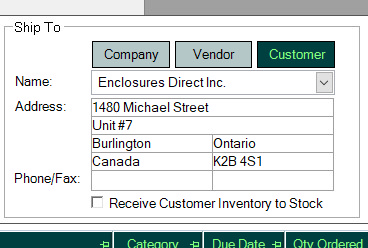
| 3. | Under the Ship To heading, your company address will always show by default. However it is possible to ship to another vendor or customer if necessary. To do this click on the appropriate option button, then select the destination from the drop down menu. |
| 4. | Add a new Ship To Address on the fly from a PO by clicking on Customer then click on the box beside the Name to open the add Ship To form |
Item Details Section
| 1. | Choose the Item number. (Doing this will bring up all the default information for the item including description, category, price, etc.) |
| 2. | Choose the date the item is to arrive under the Due Date field. If you keep clicking on the field a calendar appears from which the date can be selected. |
| 3. | Enter in the quantity to be ordered under the field labelled Qty Ordered. |
| 4. | Scroll the details section to the right and ensure the price is correct (Unit Cost field), or enter in a different price if required. (If the price is changed to something other than the standard price, the variance will be reflected on the Vendor Invoice Form). |
| 5. | If a comment is required scroll the item details section further to the right until the field Comments comes into view and enter the required comments there. |
| 6. | Scroll through the entire Item Details section and ensure that the information seen there is correct. |
Once the above steps have been concluded, the Purchase Order can be saved into the system by simply pressing the Save button in the bottom left corner of the Form. At this time the Purchase Order will be saved, and a Purchase Order number will be assigned to it that displays in the top left corner of the form. To refer to this Purchase Order in the future simply select it using the number that was just assigned to it from the drop down-menu labeled Purchase Order No in the top left corner of the form.
Modifying Existing Purchase Orders
To edit an existing Purchase Order, simply choose the Purchase Order you want from the drop down-menu in the upper left hand corner of the form and then make any changes necessary.
When copying a Purchase Order if you have a mixture of product and services users will receive a prompt and will then need to filter out the service items.
Deleting Purchase Orders
A purchase order should not be deleted unless absolutely necessary. It is always better to try and fix a Purchase Order through editing rather than deleting it. If it is imperative that the Purchase Order gets deleted then do so by simply clicking on the [Delete] button, which is located in the bottom left hand corner of the form.
Purchase Order Revisions
If it is necessary to alter a purchase order for any reason, you are able to track the change by creating a purchase order revision. To create purchase order revision, view the purchase order to be revised in the purchase order form, go to the Tools menu and select Create Revision. The form shown below will be displayed.
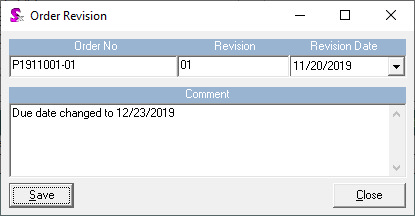
Type the reason or any other applicable comments into the Comment field and click the Save button. When the Order Revision form closes the revision number will be appended to the purchase order number in the purchase order module's purchase order no combo. For example, if you created a revision for purchase order PO0603, after creating the revision you would see PO0603-01 in the purchase order no combo. PO0603 will no longer be available for selection.
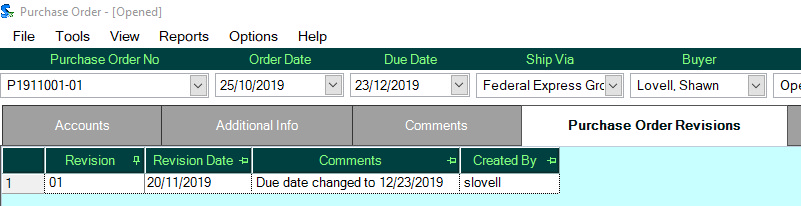
Revision information is displayed on the Purchase Order Revision tab as displayed in the image below.
Creating Blanket Purchase Orders
Create a Purchase Order with multiple lines and the required due dates as shown below. You can use the Copy Line function by right mouse clicking on the line item.
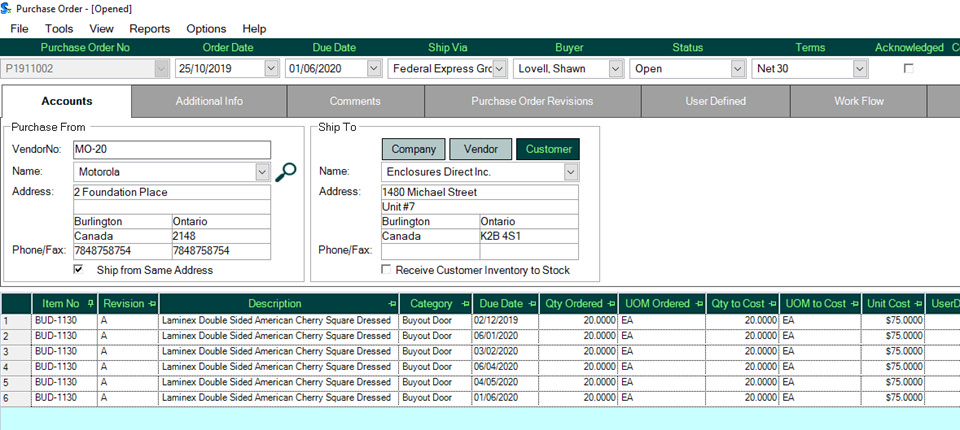
Issue the purchase order to your vendor. As each line item is delivered, use the Receiving module to receive, approve and update inventory. OrderStream will warn you that One or More lines are missing a Qty. Click YES to proceed since this is a blanket Purchase Order and the remaining line items will not be received at this time.
Continue the receiving process until all the line items on the Purchase Order have been received.
|


