|
In This Section
Creating New Work Orders
1) Start by clicking Add. This will automatically generate a sequential Work Order number. The Date Created defaults to the date currently Setup for Windows.
2) The next step is to select a customer from the drop down. If the customer is not present in the drop down box, you may first have to set them up in your financial package and then import them into Seradex software.
3) Enter all information such as the customer purchase order number etc. You can also select whether the material for this work order is to be supplied by the customer.
4) Select an item from the drop down. NOTE: Only items classed as "Make" on item main will show in the drop down list. Remember all Seradex drop downs have a type-ahead feature that allows the user to select the item by simply typing in the first few characters of the desired selection and the system searches for that selection for you.
5) Once the item is found, the user is able to view the structure of the item by right mouse clicking and then clicking on Item Details. Here you will be viewing the structure that has been created for that item in Item Main. You are, however, able to adjust the structure in the work order from here, if needed.
6) On each line item is a field that will show the Scheduled Complete Date based on the latest Schedule.
Work Orders can also be automatically generated for sales orders when the currently viewed sales order is approved. It is also possible to disable the prompt which forces users to decide if stock make items are to be excluded from the generated work order. This functionality is enabled through application preferences.
Allocating Material To A Work Order
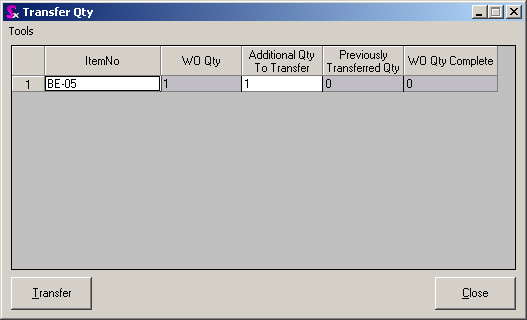
By clicking the Transfer Materials button, a form is displayed as shown in the image below. After clicking on Transfer, a system generated material transfer batch number is assigned to the work order All materials that need to be transferred to start production are selected and a batch created that allows the user to easily include or exclude items to be transferred.

To view the transfer form, double click on the Material Transfer number located on the main work order form.
Consolidated Transfer
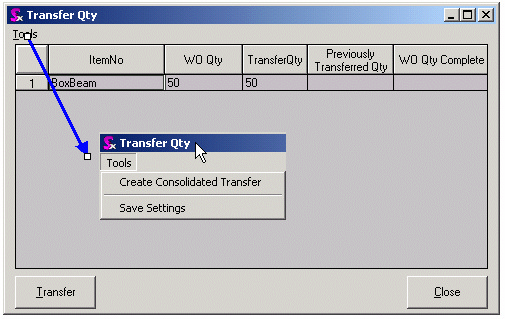
When you create a transfer for a Work Order, the system allows you to create one transfer per work order line item or one transfer for all work order lines.
Figure

If you want to create a consolidated transfer for the Work Order, click on Tools and select Create Consolidated Transfer. If you desire you can save the settings and all future transfers will be consolidated. – NOTE: This setting is saved by workstation.
The Transfer Material function in Work Order allows the user the option to create and post the transfer and update inventory without having to open the transfer and click on Approved.
Completing Work Orders
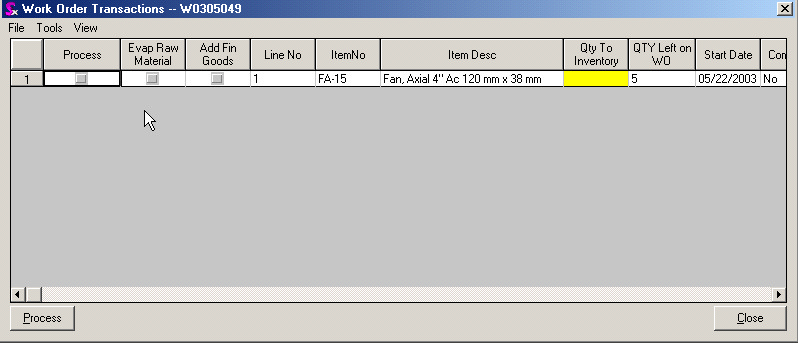
To complete a Work Order as shown in the following image, enter Qty to Inventory, Completion Date and click on the process flag then the process button in the bottom left. This will add the finished item to Inventory and evaporate the stocked raw materials. If buy/non-stock items have been received to the WO, they will also be evaporated. These buy/non-stock items will not be relieved at Completion process unless they have been bought and received to the WO. (With a transfer we will relieve the stocking items according to the transfer. Without a transfer, we will relieve stocking items according to the BOM.)

Batch Work Order Completions
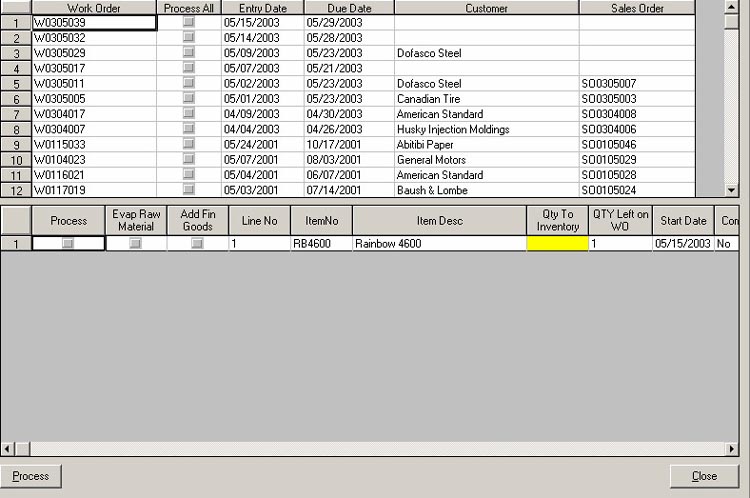
In the Complete Work Order form there is a View menu that will display All Open WOs.

Click once on the Work Order number in the top half of the form to see the line item details in the lower half. You can either click on Process All to complete all line items or click on the specific line items to complete in the lower half.
Once all Work Orders have been chosen, click on the Process button. This will complete all chosen Work Orders. It is suggested to run this application in the late afternoon since it may take quite some time to process the Work Orders. When Work Order is complete config/lot and serial tracked items will allocate back to the Sales Order.
Re-Allocating Material At Work Order Completion
At the Complete Work Order stage, if more or less inventory has actually been consumed in the completion of the work order, right click on the line item in the main screen and select Reallocate. You can perform an adjustment of the items and quantities to be relieved from the Work Order. The form shown below will display. At this point, it shows only the items that have been relieved as per the Transfer.
By clicking in the Raw Mat # field and using the insert key, the user can locate additional items to relieve for this order. By selecting an existing line and deleting the user can remove allocated inventory from the Work Order line. By modifying the quantity, the user can increase or decrease the amount of a specific Item to that Work Order line.
To finish the transaction, click on Save to return to the completion form.
Creating a Transfer from Work Order
Creating a transfer from Work Order will transfer the children required to produce the parent item. The Parent item is displayed on the pre transfer form (which is what you supplied in the attachment), but it is the children which will be populated on the inventory transfer when it is generated. Once the transfer is generated and inventory is updated you should see the children populated on the reallocation form.
If you are returning inventory to it's source location, make sure that WO Reallocation - Return Inventory to Source Location is checked in Application Preference. When it is the inventory will be returned to the source location specified in the originating transfer document.
|

