|
In This Section
Creating a New Receipt
The first thing that needs to be done is to click the [Add] button located in the bottom left of the form. Doing this will clear any information that is already on the form and prepare it for the entry of new information. The user is now ready to enter in all the necessary information. Please follow the steps below to do this.
Header Section
Select the Purchase Order Number that the receiving will be done against by using the drop-down menu or the type-ahead feature in the PO No. field. Set the Date field to match the actual date of shipment. Clicking the down arrow in this field will bring up a calendar that can be used to select the date.
Enter the Receivers name by using the drop-down menu or the type-ahead feature in the Receiver field. Alternately the buyer name will default if their log on name is entered at Employee form in Lookups module. Please refer to Employees.
Main Body Section
All the necessary information in this section will automatically be filled in when the PO number is selected in the header section. Simply ensure that the information is correct.
Item Details Section
Every line item that was on the chosen PO will now appear in this section. Fill in the quantities to be received for each one of these line items in the Qty Received field.
Scroll to the right and ensure that the Completed field is properly set. If more will be received against that line item the Completed field should display No. If the order is complete the field should be set to Yes.
If a comment needs to be inserted, continue scrolling to the right and enter it in the Comments field
Once the above steps have been concluded, the receipt can be saved into the system by simply pressing the [Save] button in the bottom left corner of the Form. At this time the receipt will be saved and a receipt number will be assigned to it that displays in the top left corner of the form. After this has been done the receipt then needs to be approved. To do this, simply click on the [Yes] option button found at the far right of the header section.
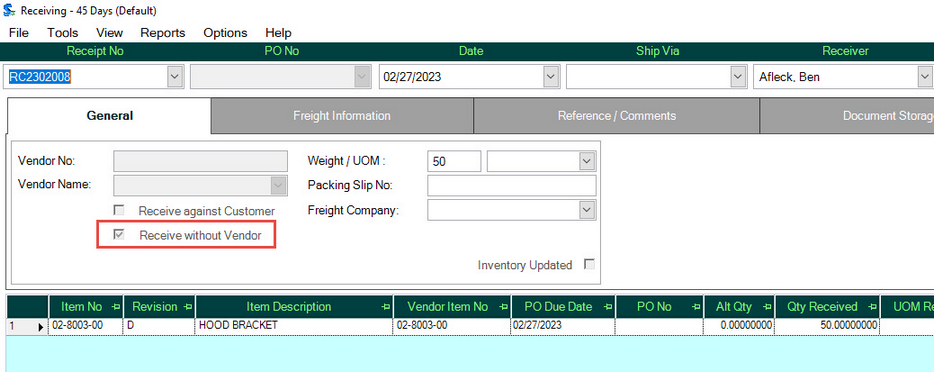
Receiving Without a Vendor or Purchase Order
You can receive an item without a Vendor or PO by clicking in the Receive Without Vendor box.
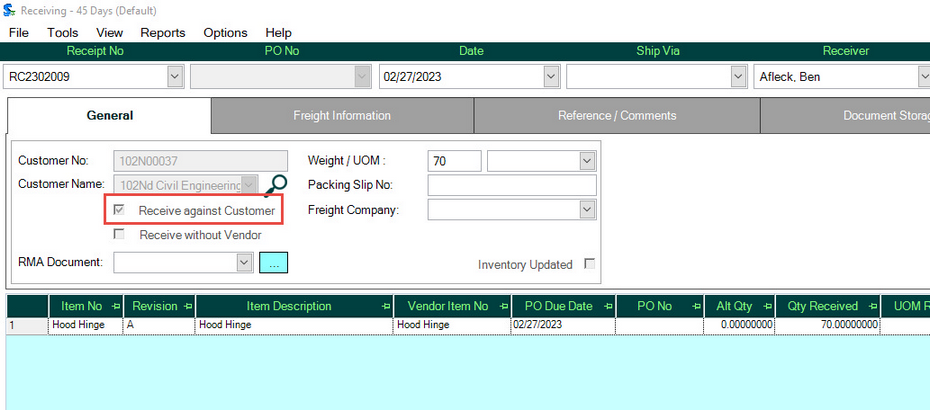
Receiving Against a Customer
This allows you to receive faulty returned product to quarantine or new product to be processed in manufacturing. As shown in the image below, if you click add then Receive against Customer and pick a customer, the items combo box displays all sell and buy items.
Issue Return Material Authorizations and track customer returns for assessing credit repair and warranty issues. The RMA# can be added on the Additional Information tab.
Also use this functionality to track customer supplied materials that you will process in production.
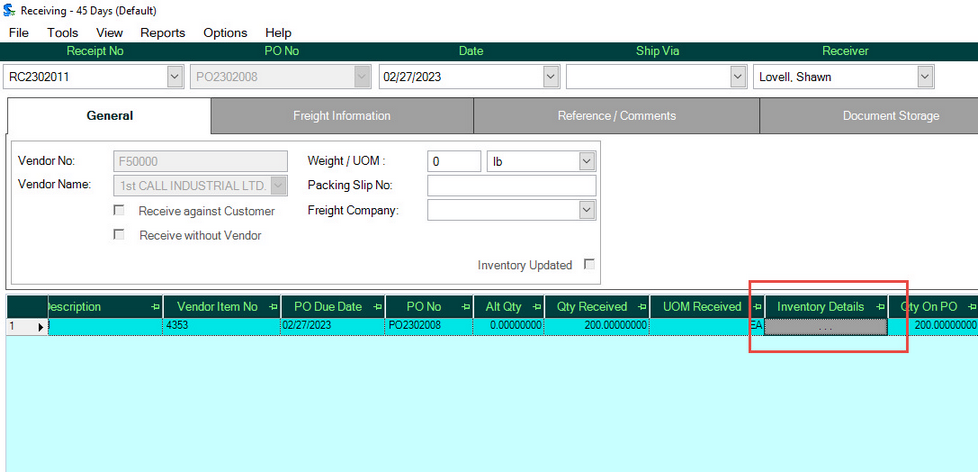
Receiving Lot Tracked and Serial Tracked Items
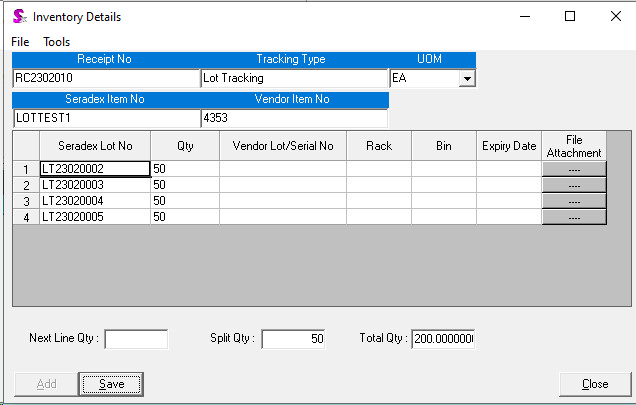
When your vendor delivers Lot/Serial tracked items, there may be several Lots or Serial numbers to track. At receiving you can assign these numbers to each group of items by splitting the original quantity. After you have entered the total received quantity, click on the Inventory Allocation button.
When you click the Inventory Allocation button you will see the following Inventory Details window. It is in this window that you split the item into quantities that correspond to the number of Lot or Serial numbers that are to be received.
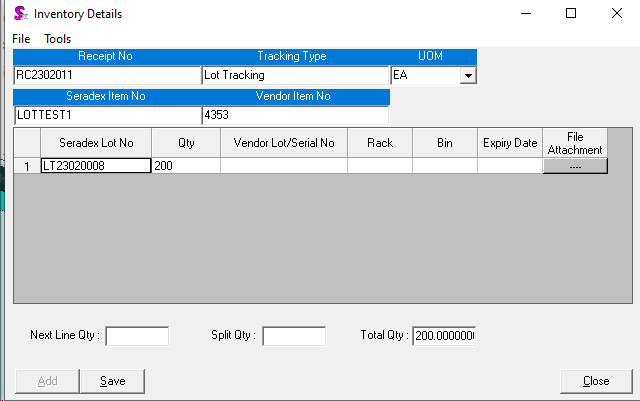
You can split the quantity by Next Line Qty or by Split Qty but not both at the same time.
This next screen shot demonstrates splitting the lot by quantity. For instance, if the vendor sent 4 Lots of 50 each, you will enter the value 50 in the Split Qty text box then press Enter and click the Add button. Notice that 4 lines are divided into lot sizes of 50 units each.
NOTE: To change the Rack/Bin for items that are Lot or Serial items, you have to do it on this form. The Rack/Bin fields are located for these items on the receiving line as seen in the screenshot above.
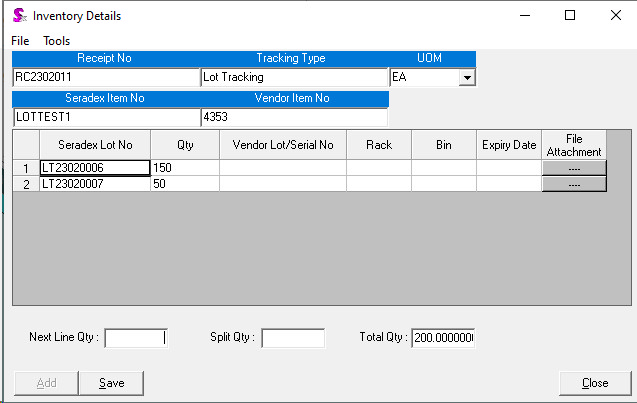
The next screen shot demonstrates splitting the lot by line quantity. If the vendor sent you 2 Lots, the first lot having a quantity of 150 and the second lot having a quantity of 50 enter 50 in the Next Line Qty field, press Enter then click Add.
Resizing the Widths of Columns
Upon loading of the Inventory Receiving Details form it will resize based on the collective widths of the initially visible columns. If you wish to resize and save column sizes to set preferences other than the default preferences you can do so by opening the Right Click Menu in the Inventory Details form and using the Save Spread Settings.
If you decide later on that you don't like the re-sizes you have created you can again open the Right Click Menu and this time choose the Restore Default option.
Deleting an Existing Receipt
A receipt should not be deleted unless absolutely necessary. This is due to the fact that deleting the receipt can cause any information related to that receipt to also be deleted. Although this may not always be the case, it is always better to try and fix a receipt through editing rather than delete it.
Reversing an Approved Receipt
The recommended method is to create and process a vendor return to remove the inventory, reverse the AP Accrual (if AP invoice is unpaid) and reset the status of the associated purchase order.
|


