|
Tax Rules give the user a manner in which to apply taxes at a more detailed level than just applying a Tax Group to a Customer or Vendor. If there is a situation where a customer is tax exempt for all items they purchase from your company except for one item, it is possible to setup tax rules that will allow for this situation to occur.
After this rule has been created, OrderStream will know to apply tax only to that one specific item for this Customer, and no tax to all other purchases.

The Tax Rules form is split up into two sections. The top section is for your Customer Tax Rules, and the bottom one is for Vendor Tax Rules. Within each section there is a group of columns and rows. The columns list the Customer, or Vendor Tax Groups that exist. The rows list these same Tax Groups, but are related directly to the Items, not the Customers or Vendors. Tax Rules are assigned at the intersection of the Customer Tax Groups, and Item Tax Groups, as necessary.
Note: Sales Taxes are calculated on sales order lines, invoice lines, PO lines and vendor invoice lines. This is accepted by major tax authorities. This method can lead to minor rounding variances compared to calculating taxes on the invoice total but both methods are accepted. The difference is due to the rounding occurring on each lines calculations.
Adding Tax Rules
To add a new Tax Rule follow the instructions outlined below:
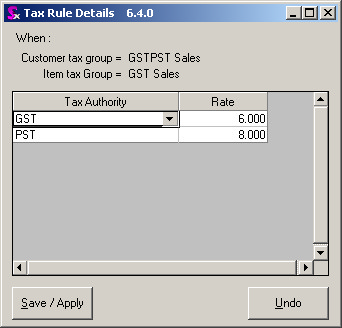
| 1. | Determine the intersection where the Tax Rule is to be placed. Using Figure 1218 as an example, if you want to create a Tax Rule for a customer that is tax Exempt, but pays both GST and PST for certain items, locate the intersection of Customer Exempt, and Item GSTPST, (the cell that is outlined in bold black), and double click on it. This will bring up a form that looks like the one shown below. At the top of this form the rule is displayed. In the example shown in Figure 1219, the rule created here will apply when the Customer Tax Group is Exempt Sales, and the Item Tax Group is GST and PST on sales. |
| 2. | Press the Insert key on the keyboard and a blank line will appear. |
| 3. | Fill in the Tax Authority that is desired. The only Tax Authorities that will be available to choose from will be the ones that were associated with the specific Tax Groups referenced in the rule. In the example shown below, no Tax Authorities were assigned to the Tax Group Exempt Sales, but a PST and GST Tax Authority were assigned to the GST and PST on Sales Tax Group, therefore the only Tax Authorities available to choose from are GST and PST. |
| 4. | To add another Tax Authority simply press the Insert key on your keyboard again, and enter the appropriate Tax Authority. |
When all the Tax Authorities have been chosen for the Tax Rule, click on the [Save/Apply] button to save the rule details into the system.
Editing Tax Rules
To edit an existing Tax Rule, simply double-click on the Tax Rule you want make changes to and the Tax Rule Details form will appear.. From here you can add more Tax Authorities, or remove existing Tax Authorities by clicking on the line number and then pressing the Delete key on the keyboard.
Deleting Tax Rules
A Tax Rule should not be deleted unless absolutely necessary. Doing so can affect the manner in which the program operates, (i.e. improper taxes being applied to Sales Orders or Purchase Orders). Although this may not be the case, it is always better to try and edit a Tax Group, rather than deleting it.
To delete a Tax Rule simply double-click on the Rule and when the Tax Rule Details form appears remove all the Tax Authorities. To do this, click on the line number of the Tax Authority to be deleted and then click on the Delete key on the keyboard.
|


