|
In this Section:
Creating New Items
Follow the steps outlined below to add a new item to the database.
| 1. | Click on File in the menu bar |
| 2. | Select New Item. This will bring up a screen like the one shown in the following image. |
| 3. | Fill in the Item Number and Description fields |
| 4. | Every field that has an asterisks beside it needs to be filled out, therefore fill out the following fields |
| • | Job Cost Category - should have already filled in when the user chose the category * |
| • | Weight and Weight UOM when adding a new item, the system will default the Weight/UOM to Lb * |
| • | Location - should have already filled in when the user chose the category * |
| • | Options - (check any box that is appropriate) |
| • | Buy - Check this box if the item is purchased from vendors. Items identified as Buy can be assigned to vendors and will be available for selection in the Purchase Order module. |
| • | Sell - Check this box if the item is sold to customers. Items identified as Sell are available for selection in the Estimate and Sales Order modules. |
| • | Make - Check this box if the item is manufactured by your company. Make items can have bill of materials created for them and they are available for selection in the Work Order module. |
| • | Stock - Check this box if the item is kept in stock by your company. The setting of the Stock checkbox impacts how the item interacts with system purchasing modules, such as Mat Req and MRP. |
| • | Shippable - This box is used by the Shipping Details module. If this box is checked, the item will be available for selection in Shipping Details. |
| • | Type - check any box that is appropriate. |
| • | Raw Material - Used for custom reporting purposes and has no bearing on core system functionality. |
| • | Finished Goods - Used for custom reporting purposes and has no bearing on core system functionality. |
| • | Miscellaneous - Items identified as Miscellaneous will appear against all vendors in the Purchase Order module. |
| • | Assembly - Turned on and off by the Make option check box. If the Make check box is checked, the Assembly flag will be automatically checked. If the Make check box is not checked, the Assembly flag is unavailable for editing. The Assembly box is also enabled if the item is designated as a Sub Contract Parent. |
- Standard Cost is assigned
- Replacement cost is from Primary Vendor and includes freight, duty, overhead and currency conversion factors.
- Most recent cost is the cost most recently recorded on PO (This cost is calculated as source cost times currency conversion only. It does not include any freight, duty or overhead factors.)
| • | Fill in any comments required in the large comments field in the bottom right of the form. |
| • | Tax Groups control how line item taxes are calculated for Buy and Sell items. These drop downs will only display Item Tax Groups |
| • | Classification Used for Sub Contracting Module |
At the bottom of this form beside the Close button is a field Focus on Item. This allows the user to create a new item then remain on that item when the form is closed.
Modifying Existing Items
To edit an existing item,
| 1. | Ensure that the item editor is in the Properties State. |
| 2. | Now right click on the item that is to be edited and select Edit Component from the menu that appears. |
| 3. | This will bring up the Edit Vendor screen where required changes can be made. |
| 4. | Remember to click the Save button in the bottom left corner after making any changes to a Receipt or the information will not save into the database. |
Copying Existing Items
To speed up the process of creating new items, it may be beneficial to copy an existing part number which has a similar setup to the new item you are creating. When copying items you have the option of selecting the item attributes you wish to copy from the existing item and apply to the new item. Then you can simply edit the differing item attributes once the new item is created.
To copy an existing item, open the Item Editor and click on the item to be copied in the tree view (left hand pane of the Item Editor form). Then either:
| 2. | Right click and select Copy Item from the menu |
| 3. | Select Copy Item from the Item Editor Edit menu |
Each of the above three options will display the Copy Item form.
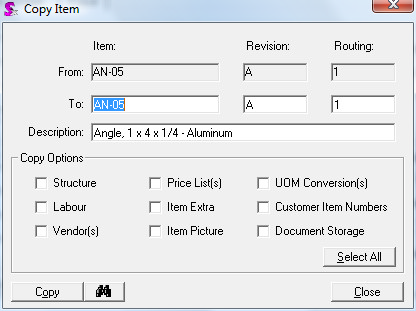 Copy Item form with copy options
Assign the new item number to be used for the new item being created by entering it in the item text box in the To row. If you wish to use the same item number that was used for the copied item as a new item, you can do so by modifying the Revision or Routing fields. This will create a second item with the same item number; the new item will be a unique part (not automatically interchangeable with the other parts it shares its item number with) and identified by its revision or routing. You are able to, with limitations, overwrite an existing item number. See Overwriting Existing Items for more information.
Next, enter a description that best reflects the new item being created. By default the description of the item being copied is entered into the Description text box. If you wish to check to see if your desired item number is in use you can click the binoculars to launch the item editor search form.
Next select the item attributes you wish to copy from the existing item to the new item. You do this by clicking the various copy options presented on the form. You can select all the options quickly by clicking the Select All button. When you are finished selecting copy options click the Copy button. This will create the new item using the specified criteria and open the new item in the Item Main form.
Overwriting Existing Items
When copying an existing item, you are able to give the new item the item number that is in use provided that none of the scenarios listed below are true.
The item being copied over CANNOT:
1. Have Child Items attached to it.
2. Be a Child Item in another BOM.
3. Have Operations attached to it.
4. Have Vendors attached to it.
5. Have Prices attached to it.
6. Have ItemExtra data attached to it.
7. Have UOM Conversions specified for it.
8. Have Documents attached to it in Document Storage.
9. Have Customer Codes attached to it.
10. Have ItemSpecs built for it.
When attempting to copy over an item, if any of the above scenarios are true you will receive the following prompt.
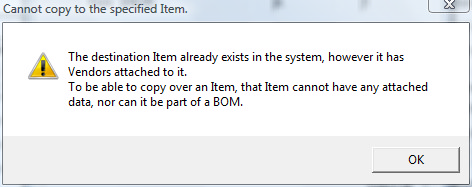 Notification that item cannot be copied over
The item data featured in scenarios 1 to 9 can be removed from the item being copied over by selecting the item in the Item Editor and manually removing the data from the item. In the case of scenario 10, if the item is not included on an open transaction,
the item spec clean up tool can be used to remove the unused item spec from the system.
Deleting an Existing Item
It is not possible to delete an item from the item editor. Instead, the item can be set to be Inactive.
To do this:
1. Open the Item Main screen for the item that is to be set to inactive
2. Click on the Inactive button located in the options section.
3. Next, click Save or the information will not be retained in the database. The next time that the item is brought up in the Item Editor it will display with a red X through it to indicate that it is inactive.
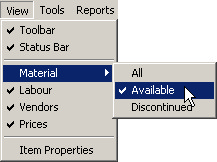
By default the system will not display Inactive (Discontinued) items in the drop down list.
To open an inactive item:
1. Go to the View then
2. Material Menu option as shown below and
3. Click on All so see Active and Inactive Items or click on Discontinued to see only Discontinued items.
Note: Once an Item is tagged Inactive you will not be able to select this item on any new Estimates, Sales Orders, Work Orders or Purchase Orders.
Multi Facility
Requirements: facility setup, locations assigned to facility, item is a stock item
Finished goods in facility
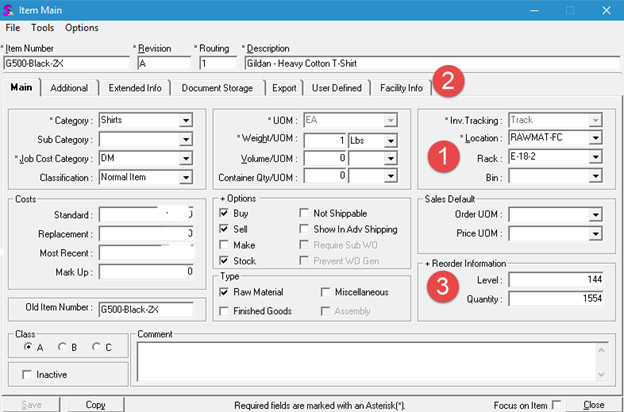
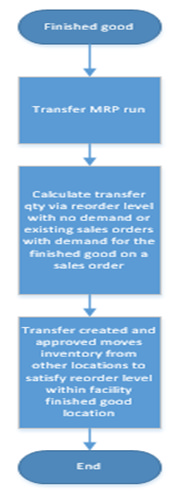
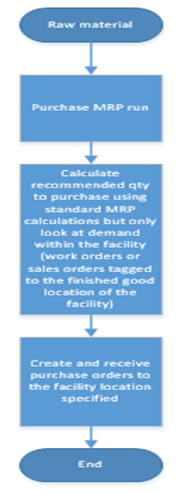
Buy/sell/stock or make/sell/stock items can have specific reorder levels set up per facility. By setting up those reorder levels in either the Finished good or Raw material location within the facility will dictate to either Transfer MRP to monitor the level of finished good or reorder level for replenishment from other locations within the company setup. Or in the case of purchase MRP will override the reorder information provided (fig 1 bullet 3) for the purposes of purchase MRP calculations.
Bullet 1 Default location setup
For systems without multi facility activation this serves to indicate the default home location for the item record. Transfers, adjustments, purchase receipts, backflushing of production orders will all use this as the default location to pull or put inventory to/from.
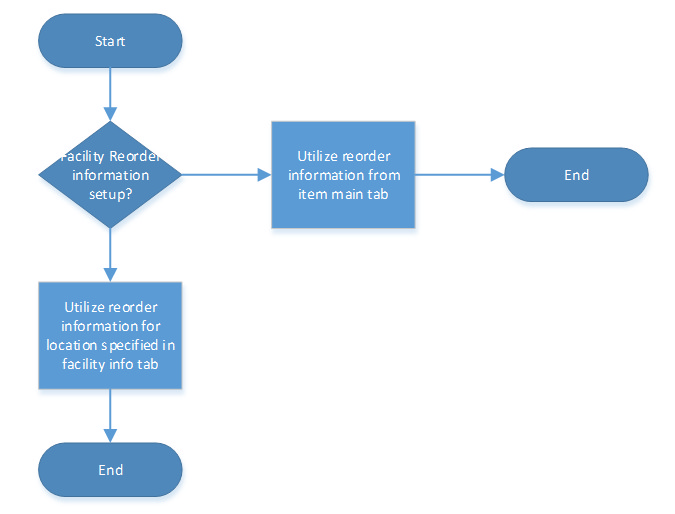
Note: if you do not specify a facility location reorder level for a stock item, system will revert to utilizing the main item screen default location information for all system functions requiring the item
Bullet 2 Facility Reorder level tab
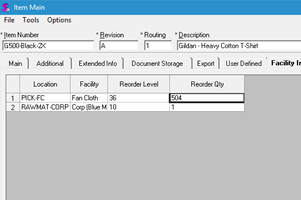
Within this tab you specify reorder level and reorder qty per facility location.
Limitation: you can only specify reorder level once per facility. Therefore if the item is a Finished good you would specify its reorder level in the Finished good location (example of this would be a buy/sell or make/sell item that you would like to keep specific inventory levels of for the purposes of selling off the shelf) If the item is a raw material used in production then you would specify the reorder information for that item in its associated raw material location so that production kitting/backflushing and purchasing mrp with multi facility license activated will utilize that reorder information and default location for the purposes of purchasing and production picking/backflushing.
Bullet 3 reorder level and quantity associated to the main tab
Utilized when no facility reorder information is provided or purchasing mrp is run with the all division option selected.
Reorder Process Flow
For Finished Goods being sold
For Raw materials requiring replenishment
|


