|
Why Is a Physical Inventory Necessary?
If the people counting dont realize the importance of accurate stock balances to them, your chances for obtaining error free counts are slim. So it is critical to explain to everyone who will participate, why a physical inventory is necessary. The basic premise is that accurate physical counts mean better customer service.
Everyone in your organization must realize that the primary purpose of a physical inventory is not to please your accountant or the tax authorities. It is to verify that the on-hand quantity of each item in your computer reflects what is actually on the shelf. Customer service personnel need to be able to trust the accuracy of the stock quantities in your computer.
Another key reason for performing physicals is that accurate physical counts are necessary for effective replenishment.
Most computer systems produce very impressive buying reports. These reports show you how much of each item the computer thinks is in each warehouse, how much will be demanded by customers in the near future, and how much should be ordered from a vendor or central warehouse.
What happens if the quantities in the computer are wrong? No matter how sophisticated the software, the wrong quantities of the wrong products will be ordered.
Planning For A Physical Inventory Count
A physical inventory is a very expensive process. It usually involves a considerable labour expense and lost production time. If the resulting count isn't accurate, the money spent on the physical is wasted.
What can you do to ensure that your physical inventory is successful? Set the count date. Do this as early as possible so that everyone has plenty of notice. Avoid dates when people are preoccupied and may not be focused on the task at hand.
Your planning should include when and who will conduct the inventory and how the counts will be taken. Provide instructions to the count team in advance of the inventory.
Prior to the Count
| • | Clean up your warehouse. Clean, straighten and organize all areas. Physically arrange items to be counted to facilitate counting. |
| • | Ship everything you can before the physical begins |
| • | Order items to arrive after the count |
| • | Dispose of obsolete and damaged items prior to the count or at least: |
| • | Isolate obsolete and slow moving stock in a separate location |
| • | Return slow moving product to the vendor |
| • | Clean out the return goods area |
| • | Rework items where possible and use them in production |
| • | Sell off overstocks at a discount |
| • | Label all consignment items |
| • | Label all non inventory items that do not need to be counted e.g. - office and plant supplies, furniture and equipment |
| • | Consolidate rack locations. Make sure the same item is not stored in multiple racks within one location - this can lead to incorrect adjustments. |
Pre-Counting
Consider counting surplus areas and slow-moving products before the scheduled physical inventory. Many companies try to count all of their products in just one day. Thats a lot of work. If some items can be counted in advance, the pressure is reduced.
The possibility is small that significant amounts of your dead stock, slow moving inventory and surplus material will move during the week preceding your physical, so you should count the bins containing these items before the day of the actual physical.
Be sure to mark bins and shelves that are pre-counted. Keep in mind that you must have some mechanism for adjusting these quantities if some amount of a product is sold or received after the bin has been counted.
OrderStream Preparation
| • | Approve and post all receiving, shipping, adjustments, and transfers |
| • | Process all completed work orders |
| • | Run inventory by location reports for all inventory held off premises provide to vendors to approve or inspect yourself |
| • | Adjust all items with negative quantities to 0. Negatives can occur for several reasons including: |
- Unposted receipts
- Items listed on a bill of material that are not actually used on the bill.
- Items that have been scrapped and replaced without recording it in OrderStream
Order the Necessary Supplies
Supplies may include count cards, clipboards, and computer paper
Create a Zoned Map of your Warehouse
Include every cabinet; shelving unit, rack and any place where material is stored. Be sure to include the receiving dock, rework and vendor return areas. Remember that all material in your warehouse at the time of the physical inventory must be counted.
Assign Teams to each Zone Identified on the Map
This will avoid overlapping or failure to cover an area. When establishing count zones, remember that a counter should normally be able to count between 50 and 120 items in an hour. Take more time with hard-to-count products such as those that need to be weighed or closely examined. On the other hand, boxed items with just a few pieces on hand can be counted in a few seconds.
A team consists of:
|
|
|
Zone Manager (1)
|
| • | Responsible for the count of the zone. |
| • | Audits a percentage of tags, all A item counts, etc. |
| • | Makes sure no tags go missing, |
| • | Helps match tags to items |
| • | Checks blank tag additions |
| • | Assists in getting adequate descriptions, units of measure |
| • | Ensures items are counted in a systematic, consistent manner (left to right, top to bottom) |
| • | Makes sure all items in the zone have a count tag |
| • | Supervises application of move tickets |
| • | Investigates identified variances |
|
Tag Counters (1-5)
|
| • | Should be familiar with the stock and with the item numbering system Should have legible handwriting |
| • | Tag Counters place tags on items, enters the count quantity on both copies of the tag |
| • | Makes sure no tags are lost |
| • | Writes up blank tags for items not identified on preprinted tags |
| • | Audits other counters tag counts |
|
Count Sheet Control Person (1)
|
| • | Enters variances into excel count sheet |
| • | Organizes 2nd copy of returned tags |
| • | Ensures all 2nd copy of all tags are accounted for and there are no missing tags |
| • | Enters blank tags additions onto excel count sheet |
| • | Identifies proposed count adjustments for Zone manager to review and approve |
|
Meet with Inventory Teams to Review the Plan
| • | Explain how the count will proceed |
| • | Give specific zone assignments to the inventory teams so that physical boundaries are clearly identified. |
| • | Remind inventory teams not to destroy tags or sheets but rather to void them in case of error. |
| • | Advise inventory crews their count is being audited, so accuracy is important. |
| • | Review with the inventory crew the procedure for preparing count tags, blank tags and move tickets and entering into the excel inventory sheets. |
| • | Stress accuracy of the counts. |
| • | Explain who will double check what. |
| • | Explain that no material is to be moved out of their zone until after the count. |
Additional Considerations
| • | Unit-of-measure. Make sure you count in the stocking units of measure. For example, 20 Ft lengths of pipe may be counted in pieces by error. If the Seradex stocking unit is Feet make sure you count in feet. (The inventory tags display the stocking unit of measure) |
| • | Wrong item numbers - the item number on the tag is not in fact the item number on the shelf. |
| • | Missing Tags track all tag numbers and void tags not used |
| • | Empty boxes or "hollow squares" in stacked goods. |
| • | Incorrectly labeled boxes containing scrap, obsolete items or lower value materials
Double-counting inventory in transit between locations. |
| • | Including sold items not yet shipped to a customer |
| • | Including inventory receipts for which corresponding payables had not been recorded. |
| • | Over / understating the stage of completion of work-in-process. |
Physical Inventory Methodology
There are many different methods used to count inventory. In OrderStream there are 2 basic methods:
1) Standard Physical Inventory Count Sheet
2) Physical Inventory with Cycle Count
Listed below is the Standard Physical that you can tailor to your individual requirements.
There are 4 documents critical to the success of your count. These are:
| 1) | Pre-filled Count Tag printed from OrderStream |
| 2) | Blank Count Tags for items not listed on OrderStream Inventory |
| 3) | Move Tickets describing where the item should be moved to after the count |
| 4) | Excel Count Sheets listing all inventory items in the zone |
Pre-filled Count Tags
Count tags can be printed from the OrderStream system. One inexpensive method is to print these on perforated business card stock, which can be purchased at your local office supply store. These cards are approximately 2 x 3.5 on heavy stock. The same size can be used to print on Avery adhesive labels if this is preferable. These can be printed on a laser printer quickly and legibly and are much superior to a dot matrix printout.
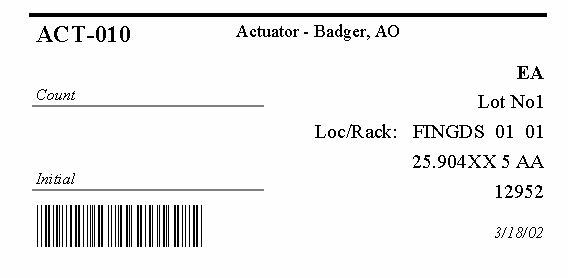
Sample Count Tag
These cards are placed on shelves or bins before the physical inventory begins. The tags consist of two parts. The count quantity is entered on both parts and initialled. One part is returned periodically to the zone manager. Every item in the zone should therefore have a tag associated with it. If there is no tag, the item has not been counted.
This allows counters to go down each aisle counting each bin in sequence. The tags include the lot / serial number data if you have items with this information. The process goes quickly because the card to record the count is already in the bin. This method facilitates the discovery of "lost" and misplaced material. If you use count cards be sure each counter has a supply of blank cards to accurately record discovered or misplaced merchandise. The blank cards should be printed on brightly coloured card stock so that material that needs to be moved to its proper location (after the count has been completed) can be easily located after the physical inventory is finished. All tags voided, used and unused should be accounted for.)
Options on count tags if you do use Rack Bin tracking in Seradex you will probably want to print the tags sorted by first location and then rack / bin.
The count tags can display the count clearly, can embed the count within a text display so only the manager knows the count or not show the count at all. Discuss these options with Seradex personnel.
Whether to use Blind Counts? A blind count is when the count tags display no quantity information. The counters count each item and write down the quantity. The count administrator then compares the count quantities to on hand quantities and investigates any variances. The theory is that if the person doesnt know the count they will not look at 15 items and write down 12.
Typically, blind counts take longer and in the end provide no more accurate data. Just the action of writing and or entering the counts creates an opportunity for error. Having someone perform a recount on all variances is necessary on blind counts. In many instances the first count was incorrect and the recount verifies the system count was correct.
However by giving your initial counters the quantity information and requiring users to only enter variance counts you will greatly reduce initial count errors, thus reducing recounts, thus enabling you to count far more product with the same amount of resources. You can spend your resources doing spot checks on counts. If you start getting high error rates from a particular counter the entire section may need to be recounted. In which case you are spending no more work then you would have by doing a blind count in the first place.
There is a downside to giving your counters the quantities. If you don't keep tight control you may find some counters cheating on items that are difficult to count by just confirming it as correct if it looks close. You also risk honest employees unconsciously making errors just because the quantity is visible. If you closely monitor the count process and thoroughly train your counters I feel that the benefits of counting more products often outweigh the risks associated with non-blind counts.
Blank Count Tags
They are 2 part forms, but should be a different color than the pre-filled count tags. These are used for items in your zone that you dont have a pre-filled tag for. You should enter item number description, location, rack / bin, unit of measure and lot/serial numbers on each of the 2 parts.
Move Tickets
Assign a different color to the move ticket cards. The move ticket identifies material to be moved and where it is to be moved when the physical is completed.
Excel Count Spreadsheet
Each zone will have a spreadsheet to complete. This can be printed if desired. The count spreadsheet will list system quantities so only variances have to be entered. If new blank tags are issued, these items will have to be added to the spreadsheet.
After all counts have been verified and entered into the Excel Count Spreadsheet, discrepancies can be analyzed. These reports should list any item with a significant difference between the on-hand balance in the computer (before the physical) and the counted quantity. You should analyze the discrepancies. Some discrepancies may be explained with counts from other zones.
Highlight items with significant differences in value (i.e. differences in the on-hand quantity times cost). You should thoroughly research these "challenges" before the physical inventory is completed. Once completed, the count spreadsheets can be imported into OrderStream to make an adjustment.
While Counting
It is ideal if you can close all departments so that no receiving, shipping or transfers are done during count.
Do not move any material while people are counting. Dont move misplaced material while you count. You run the risk of counting the material twice, or not at all. Record misplaced material where it lies, and mark it with a color-coded move ticket so it can be moved as soon as the physical is completed.
Auditing And Verifying Counts
As soon as counters are finished with a small section of bins or shelves, an auditor can verify the counts of selected products. Dont choose these products at random. Instead, concentrate on your "A" items. These are the items that have the most dollars flowing through inventory.
Experience shows that counting errors occur much more frequently with fast-moving products than slow-moving items or dead stock. As soon as an auditor verifies that the counts in an area are accurate, the quantities can be entered in your computer. If the auditor finds several counting errors in an area, the entire section should be recounted.
Creating The Inventory Adjustments
The entire zone Excel count spreadsheets can now be imported into the OrderStream inventory adjustment form.
It is imperative the person responsible for posting understands the effects of these adjustments. In many cases an adjustment is made one day to deduct the missing product and an offsetting adjustment made a few days later when it is found.
It is very common for the missing product to turn up in another zones count. Therefore it is recommended that all discrepancy count excel sheets be analyzed to account for this case. One of the biggest problems with inventory counting is that "lost product" is not handled well.
The adjustments are created, approved and posted to inventory. An item valuation report can be printed and this should tie into to the figures in your general ledger.
Post Mortem
Review your success and record your procedures. After youve finished your physical count, updated your records and reopened for business, you have one more thing to do before forgetting about physical inventories for another 10 months or so. Sit down with everyone who participated and discuss what happened.
What worked? What didnt? Who should perform what tasks next year? What could be changed to make things easier and produce a more accurate count? Place these suggestions in your physical inventory file and review them when you begin preparations for your next count.
|


