|
Overview
The physical count sheet is an alternative method of creating an inventory adjustment for a physical inventory count. The primary method the system provides for creating physical count inventory adjustments is the physical inventory with cycle count module; however, some companies prefer the physical count sheet due to their internal inventory counting processes.
The physical count sheet is an Excel spreadsheet which is provided by Seradex with your installation of OrderStream. Your companies' inventory items are loaded into the spreadsheet, the counted quantities are input into the spreadsheet then the sheet is imported into the OrderStream Inventory Adjustment module as a new inventory adjustment.
Creating A Physical Count Sheet
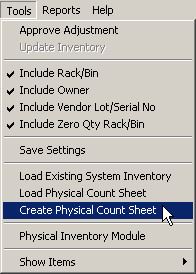
OrderStream will export your inventory items into the physical count sheet for you. To do this open the Inventory Adjustment module and go to the Tools menu. Select the Create Physical Count Sheet option.
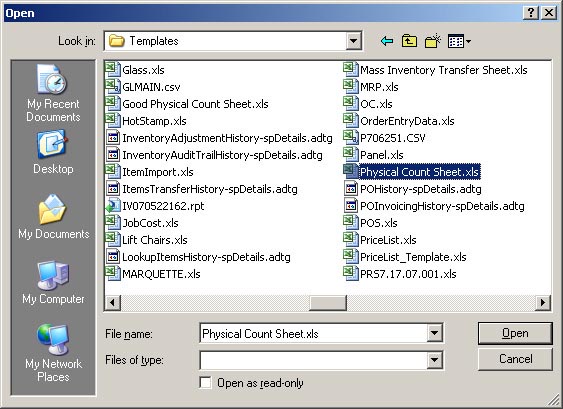
The next step is to select the physical count sheet file. Use the dialogue box to navigate to the location of the sheet and select it. The typical location of the sheet is
C:\Program Files\Active.ERP\Templates.
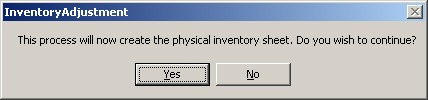
The following message will be displayed. Click YES to proceed with the creation of the count sheet.
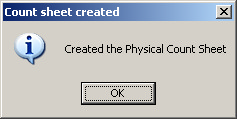
The creation of the count sheet may take a couple of minutes depending on how many inventory items are present in your ActiveM database. You will be prompted when sheet creation has completed.
Entering Count Quantities into the Worksheet
After the physical count sheet has been created, browse to the sheet's location and open it in Excel. Enter the inventory count quantities into the Counted Qty column on the line containing the counted item number. If you have counted items which are lot or serial tracked you will have to reference both the item number and the lot / serial number in the count sheet.
Note the Original Qty field in the count sheet. This value is the quantity of the respective items that were present in inventory at the time the count sheet was created. The original quantity is used to track if changes have been made to the inventory level of items on the count sheet since the time the count sheet was created and also when using an alternate method of creating the inventory adjustment based off the original quantity. See Adjustment Quantity Calculation Options for more information.
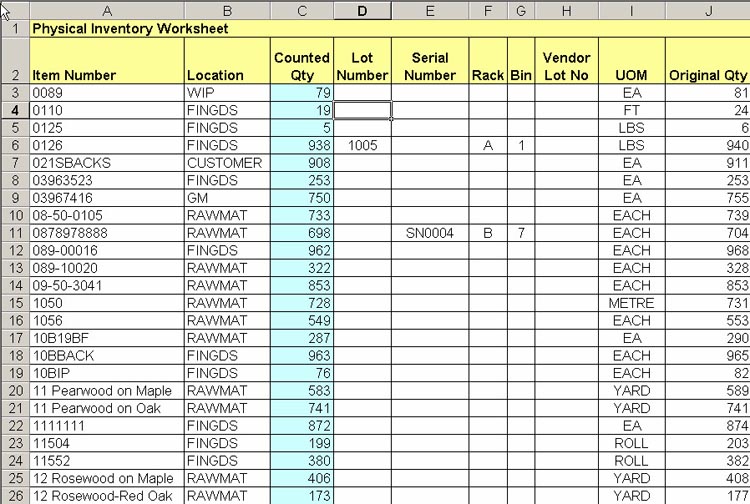
If items are lot or serial tracked or you use Rack / Bin tracking ensure those columns are completed as well. If you have several lots, serial nos or Rack Bin locations for the same item you will need separate rows in the spreadsheet for the same item no.
Note that the physical count sheet cannot be used to adjust costs. The cost that appears on the sheet is not loaded into the adjustment when is is generated. The item's standard cost is used when adjusting inventory if a cost is not entered into the New Unit Cost column on the line occupied by the item on the inventory adjustment..
Important: The system reads the sheet until a blank value is found in the item number column, thus it is imperative to not have blanks in the middle of the sheet.
Adjustment Quantity Calculation Options
Before importing the completed physical count sheet into the OrderStream inventory adjustment module, you must decide the method by which the adjustment quantity will be calculated by OrderStream. You have the option of calculating the adjustment quantity based on the counted quantity entered into the count sheet or based on comparing the counted quantity entered into the count sheet to the original quantity exported to the count sheet at the time the count sheet was created.
Adjustment Quantity Based On Counted Quantity
This is the default method by which the adjustment quantity is calculated. When the count sheet is imported into the OderStream inventory adjustment module, the inventory level of counted items will be adjusted to the quantity specified in the count sheet. For example if the counted quantity of an item is 50 and the current quantity on hand is 40, the adjustment quantity will be 10 to raise the inventory level of the item to 50. Inventory transactions involving counted items cannot be processed during the time after the count is conducted and before the creation of the physical inventory adjustment when using this method. Failure to follow this requirement will result in inaccurate inventory quantities.
For example, the original quantity of item ABC is 50. The counted quantity for this item is 65, which will result in an adjustment quantity of 15, raising the quantity on hand to 65. If a inventory is updated on a receipt featuring a quantity of 20 ABCs prior to the creation of the physical adjustment, the new quantity on hand should actually be 85 (65 counted + 20 received). However, since the receipt of 20 cannot be referenced by the system as it predated the creation of the physical adjustment, it cannot be incorporated into the new quantity on hand. Thus, the quantity on hand for item ABC will be adjusted to the incorrect quantity of 65.
Adjustment Quantity Based On Original Quantity
This alternate method of calculating the adjustment quantity is enabled via the Base Physical Count on Original Qty application preference. The adjustment quantity is calculated by subtracting the original quantity from the counted quantity. This method is beneficial if the physical inventory count is conducted over several days and it is impossible for your company to stop all inventory transactions involving counted items prior to the creation of the physical adjustment. The calculated adjustment quantity is then applied against the item's quantity on hand present at the time the physical adjustment is created to determine the new quantity on hand.
For example, item ABC has a original quantity of 1805 at the time the count sheet is created. The counted quantity input into the count sheet is 1500. During the time after the count sheet was created and prior to the creation of the physical adjustment 1105 ABCs were consumed during production, which continued during the physical inventory count, leaving a quantity on hand of 700. When the count sheet is imported into the inventory adjustment module, the new quantity on hand is calculated using the following formula: 700 + (1500 - 1805) = 395. The discrepancy between the actual quantity on hand and the quantity on hand in the system at the time of count sheet creation is captured by this method and is applied to the updated quantity on hand at the time of adjustment creation, allowing an accurate quantity on hand to be adjusted into inventory.
It is not recommended to process inventory transactions involving counted items when using either method until the physical adjustment is approved; however, you have the ability to update the physical adjustment in the event that a quantity change does occur after the physical adjustment is created and prior to the physical adjustment being approved. See If The Quantity On Hand Changes Prior To Physical Adjustment Approval for more information.
Creating The Inventory Adjustment
The physical sheet will only create adjustments for lines where the Counted quantity is not the same as what the system says it is. Any item that exists in inventory that is not mentioned on the sheet does not get touched.
When you have completed the count, return to Inventory Adjustments and click on Add and under tools click on Load Physical Count Sheet.
Search again in C:\Program Files\Active.ERP\Templates to find Physical Count Sheet.xls. Click on Open and you will get the following message.

This creates an adjustment that can be processed in the normal manner. Click on the save button and then drop the tools menu to approve the adjustment.
Remember that lines where the counted quantity matches the quantity on hand in OrderStream will not appear.
If the Quantity On Hand Changes Prior to Physical Adjustment Approval
If the quantity on hand for a counted item changes after the physical adjustment has been created, the user will receive the following prompt when loading the physical adjustment.
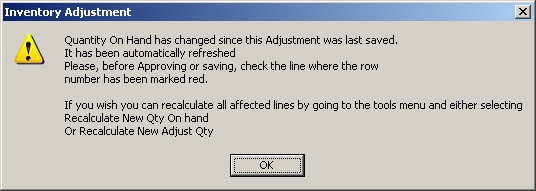
Affected adjustment lines are identified by a red background on the line number column. Either the new quantity on hand or the adjustment quantity is required to be recalculated to reflect the updated quantity on hand. To do this go to the Inventory Adjustment module Tools menu and select either Recalculate New Qty On Hand or Recalculate New Adjust Qty. Note that these options only appear in the Tools menu in the event that the quantity on hand for an item on the currently viewed adjustment has changed.
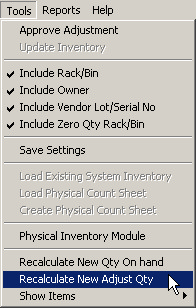
Recalculate New Qty On Hand
Selecting this option will leave the adjustment quantity unchanged and will update the new quantity on hand by applying the adjustment quantity to the updated existing quantity. The example below illustrates how the values will be updated if the existing quantity of an item has been reduced by 50 after the adjustment was created.
Prior to recalculation:
Existing Quantity: 600
Adjustment Quantity: -305
New Quantity On Hand: 345
After recalculation:
Existing Quantity: 600
Adjustment Quantity: -305
New Quantity On Hand 295
Recalculate New Adjust Quantity
This option will leave the new quantity on hand unchanged and will recalculate the adjustment quantity to reflect the new quantity on hand. The example below illustrates how the values will be updated if the existing quantity of an item has been reduced by 50 after the adjustment was created.
Prior to recalculation:
Existing Quantity: 600
Adjustment Quantity: -305
New Quantity On Hand: 345
After recalculation:
Existing Quantity: 600
Adjustment Quantity: -255
New Quantity On Hand 345
Inventory User Defined Values
If you are making use of the 10 available Purchasing/Inventory user defined fields (see Display Purchasing/Inventory User Defined Fields for more information), when a physical count sheet is generated, each user defined field will be present within the count sheet twice, once starting in column P through to column Y then again starting in column AF through to AO.
The first range is shown in the image below with sample data in user defined fields 1 and 2. Note that if you have assigned custom captions to the user defined fields, these captions will appear in the physical count sheet. See Creating Custom Field Labels for User Defined Fields for more information on how to create user defined field captions.

The first range of user defined fields is used for data entry while entering the values for the count. Enter the new values you wish to adjust into inventory against the item into the first range.
The second range of user defined values contains the existing user defined data which currently exists in inventory and is provided for reference purposes. A sample is shown in the following image:
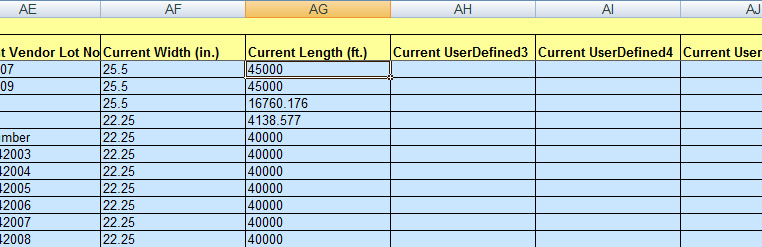
The captions contain "Current" within them and the background of the cells is coloured blue to help differentiate them from the data entry user defined cells. These cells are locked by default to prevent the current user defined data from being modified.
Note:
If you wish to modify data within the physical count sheet while user defined data exists, you must contact Seradex to have the worksheet unlocked. Once the sheet is unlocked you must make sure that the user defined data does not become misaligned (assigned to the incorrect item) by dragging values within the sheet or partially deleting data from rows within the sheet. If you are required to delete rows, you must be sure to delete the entire row to avoid the incorrect assignment of user defined data to items. This can be done by simply clicking on the row number on the left side of the worksheet to highlight the entire row prior to deletion.
|


