|
Main Tab
The fields on the Main Information tab are optional for prospects as this information may be unknown at the time of prospect creation.
Fields on the Main Info tab will display mailing information as well as a drop down for the Sales Representative.
Shipping Tab
The Ship Information tab features the shipping related information which has been setup for a customer or prospect. This information is optional for prospects. The Ship Info tab appears as indicated in the image below.
The Ship Via is the method by which the customer is going to obtaining their order; common selections include Our Truck if you provide delivery services, Pick Up if the customer has the option of picking up their order themselves, or the name of a shipping freight vendor such as Fed-Ex or UPS.
FOB or Free On Board, is a transportation term that indicates that the price for goods includes delivery at the sellerís expense to a specified point and no further. The FOB term is used with an identified physical location to determine,
1. The responsibility and basis for payment of freight charges, and
2. The point at which title for the shipment passes from seller to buyer.
Terms are the payment terms by which the customer issue payment for the goods purchased. Clicking the green arrow will open the Terms Maintenance form.
The Ship To Name is the name of the customer's default Ship To. Clicking on the envelope button will open the Customer Ship To Maintenance form where the Ship To address can be modified or a new Ship To address can be created for the currently viewed customer or prospect. Also a different Ship To address can be designated as the default; when this is done by the user the Ship To name displayed on the Ship Info tab will be updated to the name of the new default Ship To address.
When Customer is chosen in the Type field, Route, Ship Preference, Freight Vendor Info and Freight Acct No appear in Shipping Information tab.
Accounting Tab
The Accounting Tab includes Currency Code, Price List, Terms, Account Set, Commission and Tax Group as shown below.
The Customer Group combo contains all of the customers currently present in your database. This feature is used to link multiple customers together into a group for reporting purposes. Consider an example customer such as Wal-Mart. There are a vast number of independent Wal-Mart locations, but there is also one central Wal-Mart head office. Some invoices would be sent to individual stores, while others would be sent to the head office.
Correct system setup would see each Wal-Mart store present in the database as a customer as well as the head office. To create the Wal-Mart customer group, assign each store to the head office using the Customer Group combo. This creates the ability to report on all sales to Wal-Mart, regardless of location.
The Tax Group is optional for Prospects but is required to be selected for Customers. This is typically setup in your accounting system and transferred to your OrderStream database via Update Accounts. The five Tax Registration numbers also originate in the accounting system.
Once a currency is selected the only way to change it is in the database. If the currency code was changed and a Sales Order or Invoice exists then the save will be aborted and a message will be displayed.
Credit Tab
Is how much sales have come from a customer.
|
Any credit a customer might have.
|
Marketing Tab
Add a customer service representative if applicable
|
The area of the country that a customer is in and covers (ie United States West)
|
A single character code that be used to classify customers for reporting and search purposes
|
Report Groups are used throughout the system to organize data into logical groups for custom reporting purpose.
|
Another field which can be used for custom reporting purposes.
|
Standard Industry Classification code used to identify a customer's business type.
|
North American Industry Classification System, a set of industry categories standardized between the U.S. and Canada. In the U.S. it is taking over from the SIC code system.
|
Similar to Reporting Groups. Buying Groups are used thought the system to organize the data into a logical group for custom report purposes.
|
Is there a Business Agreement with this customer.
|
Lead Source
How many employees work for that customer
|
Annual sales of the customer or prospect.
|
Web Login Tab
The Web Information tab below contains information that a customer might have or wish to include should they have a web site. The Web tab includes the Web Site address, a Login and Password if necessary and an Email Address.
Opportunities Tab
How well the opportunity is progressing.
|
Date the order needs to be ready by.
|
How close you are to winning the opportunity.
|
Contacts Tab
Contacts are people associated with the customer or prospect. The CRM Contacts tab appears as indicated in the image below.

The contact form can be accessed by double clicking on a contact row. The address defaults to the Prospect Address but can be over ridden.
Do not Call and Email Opt Out check boxes
On this Contact Maintenance form customers have the option of being excluded from receiving phone call or emails. To do this open the customer's Contact Maintenance form and either choosing them from the Contact drop down and then checking either Do Not Call or Email Opt Out and then press SAVE.
Associate a Contact to a Link Type
In the Contact Maintenance form under the Contact Links tab you have the ability to associate a contact to a link type. The Link Types to choose from are Customer, Vendor, Prospect and CustomerShipTo.
In the Contact form clients will be able to see if a customer wishes to be contacted or not.
Fields in the Contact grid automatically adjust column widths to accommodate the information in each column.
1) When you open up the Contact Maintenance form, by double clicking a contact line on the Contact form, one of the things you will be able to set is the Communication Preference for that particular customer.
2) Using Nurture, Last Survey and Satisfaction Rating (0 to 10), you will be able to record how well the latest interaction with a contact went.
The email text box control on the Contact Maintenance form is pre-loaded with suggested email addresses based on contact's name and linked website.
Activity Tab
Activities enable the user to track correspondences with their key contacts and assists the user in keeping their scheduled appointments.
Row filter is located on the first line of the Activity tab grid. Choose which column you wish to filter, then enter your search criteria and either press the APPLY FILTER button at the bottom of the form or you can simply press ENTER.
Manually Creating and Modifying New Activities
To create a new activity, open the Activity form by clicking the NEW button located at the bottom right of the form. The Activity form appears as indicated below:
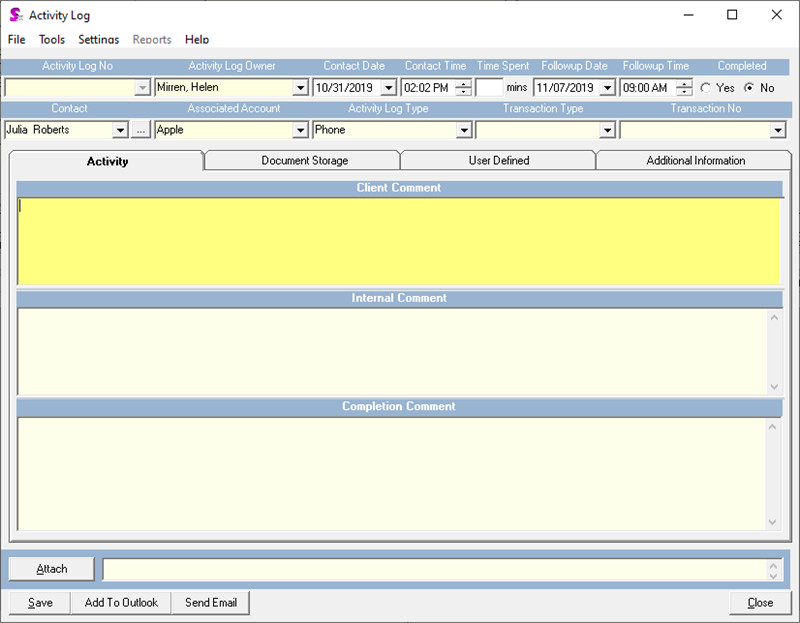
Select the contact the new activity is for from the Contact drop down. If the desired contact is not present within the menu, you will have to add it via the Contacts tab before creating the new activity. Set the Contact Date and Follow up Date for the new log; you are able to enter the time at which to follow up as well. The drop down will display Bill To and Ship To customer information.
The Activity Log Type drop down menu allows the user to categorize each activity. Examples of how to categorize activities could include Email, Telephone, etc.
The owner of the activity by default is assigned to the user who created the activity. If another person is responsible for follow up, the owner can be overridden by selecting another person from the drop down. You can also record Client (external) and Internal comments and select complete when the follow up occurs.
Click the SAVE button to add the new activity.
To edit an existing Activity, simply double click the relevant line on the main CRM form containing the contact log you wish to edit. The Activity form will open populated with the previously entered contact log data. Make the desired changes and click the Save button to update the activity.
When follow up is complete, click the Completed checkbox to identify the activity as completed. Comments cannot be saved in the Completed Comment field until the activity is completed.
Creating New Activities from Outlook
To create new activities from emails you have either sent to or received from contacts, click the Sync with Outlook button.
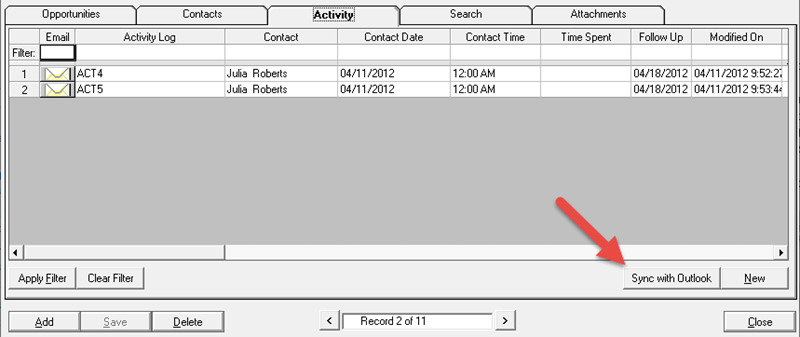
In order for contact emails to be included as part of the Outlook synchronization process, the contact must have an email address specified on the contact maintenance form, the emails must have been sent to or received from that same email address and the emails must be located in your Outlook Inbox or Sent Item folders, or in a folder that is nested inside these two folders. The Synch with Outlook button is not visible if your company has purchased a license for the Seradex Activity Exchange Agent, which completely automates the creation of activities from emails.
Creating Outlook Appointments from Activities
When you press the ADD TO OUTLOOK button the window shown below will open up where you will see that the Scheduled Date and Phone Number will be automatically entered for you from the activity you have chosen to add. You can then enter the time of the activity and if you know it, the duration.
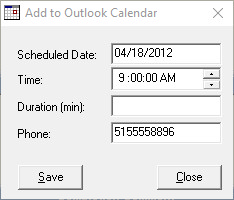
When you are done press the SAVE button.
You also have the option of using the Right Click Menu which will perform the same way as the ADD TO OUTLOOK button does.
Search Tab
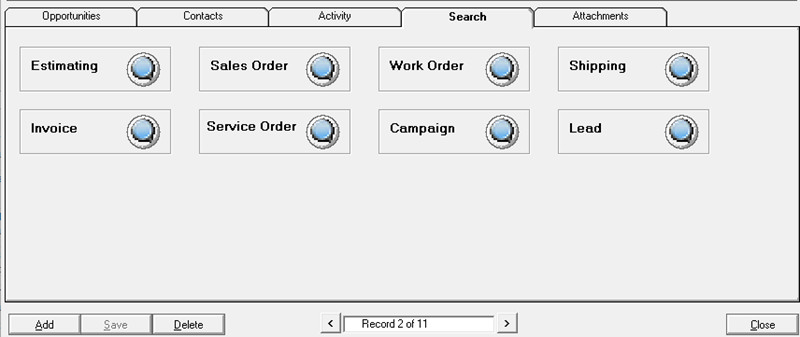
The Search tab enables the user to click the button representing a transaction type to open the corresponding transaction search form.
For example, to search for sales orders against the customer selected in CRM click the Sales Order button. The sales order search form will launch and display only results for the customer selected in CRM.
Field Reference
Will open an Estimate Search window and display Estimates based on the Customer that has been selected.
|
Will open a Sales Order Search window and display Sales Orders based on the Customer that has been selected.
|
Will open a Work Order Search window and display Work Orders based on the Customer that has been selected.
|
Will open a Shipping Search window and display Shipping orders based on the Customer that has been selected.
|
Will open an Invoice window and display Invoices based on the Customer that has been selected.
|
Will open a Service Order window and display Service Orders based on Customer that was been selected.
|
Attachments Tab
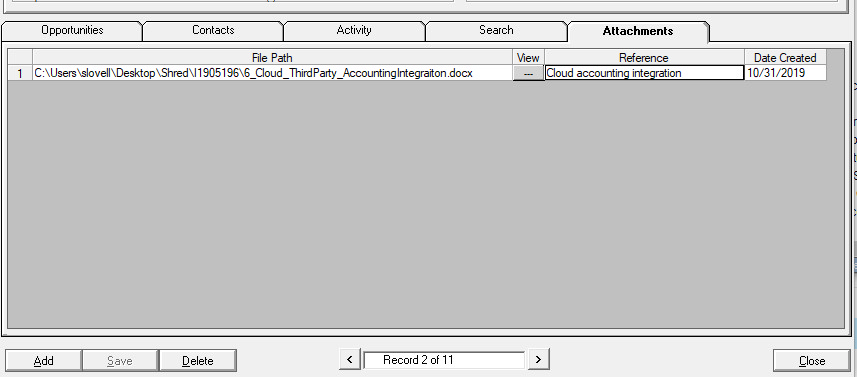
You can attach multiple documents to the Prospect or Customer via the Attachments tab. Possible attachments could include CAD files, Word documents, Excel files or PDF documents.
Field Reference
Where on your computer the file is located
|
Attach a file to the record
|
Information about the file. If necessary.
|
|

